Microsoft SCCM Integration
Abstract: This document provides an overview of Extreme Networks’ Connect integration with Microsoft’s System Center Configuration Manager
Contents
Overview
This guide details the design, installation, and configuration of Extreme Networks Connect integration with Microsoft System Center Configuration Manager.
Administrators that have to manage large Microsoft environments with both SCCM and Extreme Control will benefit from this integration in multiple ways: it will provide them with a deeper insight into device types, network adapter types, last logged on users, netbios names and so forth from a single pain of glass (XMC). It will also enable them to easily manage all MAC addresses (wired and wireless) from SCCM within Extreme Control. This helps to streamline operations and enhance troubleshooting.
The solution also enables customers to assess their managed Windows machines for missing Microsoft software patches. The results of this assessment will be available within Extreme Access Control’s assessment process.
Like any other Extreme Connect integration, the MS SCCM integration requires an Extreme Management Center (XMC) Advanced license.
Design
The solution is based on two components:
- The Extreme Microsoft SCCM Connect module which runs on the XMC server. It reguarly queries the latest computer data from the corresponding adapter running on the SCCM server (see below) and uses it to update the end-systems and their group membership within Extreme Control
- The Extreme SCCM adapter which runs on the SCCM server. It is implemented as runnable jar file and executes Powershell commands to regularly query the SCCM database for the latest computer data. It also provides a web service which can be queried by the corresponding SCCM Connect module running on the XMC server (see above) the web service returns the list of all computers and their data to XMC.
Benefits
Utilizing the Extreme Connect SCCM integration, the following benefits can be achieved:
- Automatically synchronize all MAC addresses (wired and wireless) managed by SCCM into an Extreme Control end-system group (single group for all MACs) and thus provide automatic network provisioning of SCCM-managed devices through Extreme Control
- Automatically synchronize computer data like hardware device type, operating system, last logged on user, netbios name, computer id and network adapter type from SCCM into XMC. This provide administrators and help desk personnel with the unique ability to get deep user and device insight within a single management system (XMC) and thus improves time to resolution and user experience
- Optionally queries all managed computers via remote WMI calls to get any missing Microsoft Software Updates. Provides those missing patches as assessment results within Extreme Access Control which allows customers to quarantine unpatched devices.
Components
Extreme Networks Components
Always required:
- Extreme Networks Management Center 8.2.0 or above with Advanced License(NMS-ADV-XXX)
- Extreme Networks SCCM adapter(zip package – no extra license required)
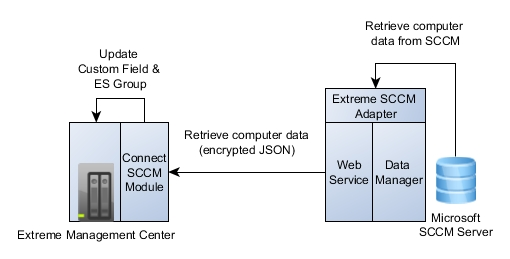
Architecture
The following architecture shows how the solution building blocks interact to achieve the final result.
On the right hand side, the Extreme SCCM adapter, which needs to be installed and run on the SCCM server, is shown. The adapter consists of two parts:
- The “data manager” uses PowerShell commands to retrieve various data about all managed computers from SCCM. That data is parsed and stored/cached within the adapter. This process of retrieving all computer data and updating the adapter’s cache is performed on a scheduled basis which can be configured using the config file.
- The “web service” is providing a web interface into the adapter and is running on all IP addresses of the SCCM server it is installed on. The port it runs on can be configured. It will return a list of all computer data in JSON format encrypted using a pre-shared key.
On the left hand side, Extreme Management Center with the Connect SCCM module is displayed. The SCCM module will regularly call the adapter’s web service (see above) to retrieve the list of all computer data. It will use the configured “password” as the pre-shared key in order to decrypt the incoming data. It will then deserialize the given JSON data into computer objects then use it to update the corresponding end-systems’ custom fields and group memeberships in Extreme Control.
Installation and Upgrade
Overview
This section will not detail the installation steps for Extreme Connect. When installing or upgrading to XMC v8 you will automatically have Connect installed if you also provide an advanced license (ADV).
This section will provide details on how to upgrade or install the SCCM adapter on your SCCM server.
Prerequisites
Software Requirements
Extreme Networks components:
- Management Center version 8.2.0 or above with an Advanced License (NMS-ADV) installed:
SCCM adapter: starting with XMC v8.2.0, the adapter can be downloaded as ZIP file from your XMC server using this URL: https://XMC_IP:8443/connect/SCCM/ConnectSccmAdapter.zip
Other components:
- Java 8 on the SCCM server (see preparation steps below)
Preparation
Install Java on the SCCM Server
The SCCM adapter is provided as executable jar file and thus requires Java 8 to run properly. Please install the Java 8 runtime environment or upgrade to 8 before continuing.
Powershell
The adapter has been tested to run with Powershell v2 and v4.
Installing SCCM Adapter
The SCCM adapter is provided as a zip package (ConncetSccmAdapter.zip) that you can download from your XMC server at URL
The package needs to be copied to your SCCM server and inflated to any folder. It is recommended to create and use this folder to copy the files into:
C:Program FilesExtreme NetworksSCCM Adapter
Files contained within the zip file:
ConnectSccmAdapter-<version>.jar: the actual adapter executable jar file that runs both the data manager as the web service
ConnectSccmAdapter.config: the configuration file
log4j.properties the log config file. There is no need to touch this file – configure the log level through the main config file (see above)
Ensure that all these files are always kept in the same folder. The adapter jar will search for both the config file and the log4j.properties file in its running directory.
Now configure the adapter see Configure SCCM Adapter
Now configure the Connect SCCM module see Configure Connect SCCM Module Configure SCCM Adapter
Test the SCCM Adapter
After you have configured the adapter through both the main config file and the PowerShell script you should test the adapter manually to ensure proper workings. The recommended test procedure is:
- Test the adapter: we recommend setting the log-level for the adapter to “DEBUG” before testing the adapter (config file: ConnectSccmAdapter.config). That way, proper functionality can be validated easily.Open a Command prompt of PowerShell command, navigate to your SCCM folder and start the agent using this command:

The output should be similar to what you see in the diagram above. If you see any errors or no output then check the adapter’s log file (file: ConnectSccmAdapter.log) or contact an Extreme representative. The adapter will start executing the PowerShell commands. Open the adapter’s log file and validate its content. You should see computer data, no errors or warnings and at the end of each iteration / data retrieval you should see a log entry similar to this one:
Successfully imported 1000 computers with a total of 2000 network adapters (=MACs) from SCCM!
Test the adapter’s web service: the final step in testing the adapter’s functionality is to open your browser and point it to the IP address of your SCCM server including the HTTP port you have configured the adapter to run on. Format:
http://<SCCM_IP>:<adapter_port>
When executed, you should get a lot of unreadable text as a result but no error. The reason the retrieved data is unreadable is that it is encrypted using the pre-shared key you configured. When you called that web service using your browser you should also see extra logs within the adapter’s log file.
Full test: Once you configured the corresponding Connect SCCM module (Configure Connect SCCM Module), ensure to set its log level to DEBUG as well. Wait for the next synchronization (you can set the poll interval to a low value like 60 seconds to force a quick synchronization for testing purposes) check the NetSight server log file to any success or error messages in regards to this integration.
Install the SCCM Adapter as Windows Scheduled Task
After you have extracted the required adapter files, configured the adapter through the config file and manually tested the adapter’s functionality it is time to create a Windows Scheduled Task that will ensure that the adapter will automatically be started on each server (re-) start, independent of any logged in user session. This will emulate a Windows Service to some extent (it still is not a proper Windows Service but an executable jar that is started / stopped through the Windows Task Scheduler!). Follow the step below to achieve this goal:
- Open the Windows Task Scheduler by either searching for it
 Or navigating toControl Panel -> System And Security -> Administrative tools -> Task Scheduler
- Create a new Basic Task

Provide a useful name and description. Example:

- Set the trigger to run the task when the computer starts

- Set the action to “start a program”

- Before we can tell the wizard how to start the adapter we need to retrieve the install path of your Java runtime environment (location of your java.exe). To find out, open a Command prompt and type where java and copy the resulting full path to your java.exe:

The next step within the task wizard is to define which program to start and how / where. It consists of three options:
Program: This is NOT the SCCM adapter but rather the absolute path to your java executable (as determined in the earlier step, include the java.exe name). You might have to put this path in double-quotes if it contains empty spaces. Examples:
C:\ProgramData\Oracle\Java\javapath\java.exe
Or:
“C:\Program Files (x86)\Java\jre1.8.0_101\bin\java.exe”
Arguments: provide two arguments for the java.exe program, separated by a space:
The –jar tells java that is should expect a jar file which needs to be executed
The absolute path to the SCCM adapter jar (including the name of the adapter jar) – enclosed in double-quotes if it contains spaces
Example: -jar “C:Program FilesExtreme NetworksSCCM AdapterConnectSccmAdapter-2.0.0.jar”
- Folder to start in: it’s important to provide the absolute path to the SCCM adapter (without the adapter jar name itself, just the path/folder). This time, do NOT enclosed it in double-quotes even if it contains spaces! Example:C:Program FilesExtreme NetworksSCCM Adapter

When finalizing the wizard ensure to choose the option to continue working on the detailed properties of this task. If you didn’t enable this option, you can always right-click on the configured task and choose “Properties”
- Within the General tab, ensure that the task is set to run whether a user is logged in or not:

- On the Conditions tab, ensure that none of the restrictive options is enabled. The task should always start on any server (re-) start.

- On the Settings tab, configure the task similar as shown below:

Configuration
This section describes how to configure both the Extreme Connect SCCM module and the Extreme SCCM adapter service.
Configure Connect SCCM Module
Since Extreme Management Center 7.0 the Extreme Connect user interface is fully integrated into OneView. Once you have an Advanced License applied, you should see a top-level tab named “Connect” within OneView. Within the Connect area, choose the Configuration tab and then the Administration tab below. Within the Administration area you can now choose the “Microsoft SCCM” module to configure the so called service first.

A “service” represents one SCCM server you want to query. In theory, you could add (and thus query) multiple SCCM servers but in reality most customers will only have one SCCM server.
To configure the connection to the SCCM adapter running on your SCCM server, adjust these available settings:
| Parameter | Explanation |
|---|---|
| server | The name or IP of the SCCM server (technically, the IP the SCCM adapter is running on so Connect knows where to find the web service to retrieve SCCM computer data) |
| serverPort | The TCP port which the adapter service is running on. You must configure the same port within the adapter’s config file. |
| password | The password is actually the same as the pre-shared key configured within the adpater’s config file. Those two values must match! Otherwise the Connect module won’t be able to decrypt the data it receives from the SCCM adapter. |
Next, move on to the “Configuration” tab where you can configure the following settings:

These parameters are available:
| Parameter | Explanation |
|---|---|
| Poll interval in seconds | This is the sleep time in between two synchronizations. On each synchronization, the Connect module will query the SCCM computer list from the adapter and process it internally. Usually it is not necessary to have the SCCM Connect module query the SCCM adapter for new data every few seconds since that data isn’t changed that regularly and each synchronization puts extra load on both the SCCM server and Extreme Management. It is recommended to set this value to a minimum of one hour or multiples of an hour (3600 secs or more). |
| Log level | The log level for this module. Each module logs into the standard XMC log file. It is recommended to set this to WARN or ERROR. Use DEBUG only for debugging / troubleshooting / testing. |
| Enabled | Enables / disables this module |
| Update local data | Always keep this set to true. When set to false, the module won’t perform the data import and is thus useless. |
| Custom field | The Extreme Control custom field where the SCCM module will write its SCCM computer data to. You can choose between all four available custom fields. Ensure that you don’t use the same custom field for any of the other Connect modules otherwise they will overwrite each other constantly. |
| Format of incoming data | Allows you to define which parts of the imported computer data to display per NAC end-system and it is formatted. When putting one of the available computer property names within two ‘#’ signs, the Connect module will automatically replace the variable with the corresponding content. Available Variables:
id, mac, macDesc, netbiosName, lastLogonUserDomain, lastLogonUser, operatingSystem, servicePack, computerManufacturer, computerModel
Default config:
ComputerId=#id#; NwAdapter Desc=#macDesc#; Netbios Name=#netbiosName#; User=#lastLogonUserDomain##lastLogonUser#; OS=#operatingSystem# (#servicePack#); Manufacturer=#computerManufacturer# Model=#computerModel#
|
| Overwrite username | When enabled, Connect will overwrite the username for end-systems in Extreme Control using the imported username (last logged on user including domain) from SCCM. Be aware that this must be disabled when you are using an 802.1X based authentication mechanism! |
| Overwrite device type | When enabled, Connect will overwrite the device type for end-system in Extreme Control using the imported devices types (operating system + service pack) from SCCM. Be aware that this will overwrite any device type retrieved using standard Control mechanisms like DHCP fingerprinting! |
| End-system group for decommissioned devices | The default end-system group for decommissioned devices |
| Remove device from other groups on decommission | Enable this to remove a device from all other groups when it is moved to the decommission group |
| Delete custom data in XMC for decommissioned devices | If a device is deleted in SCCM the end-system’s custom data field in XMC will be cleared |
| Enable assessment for software updates | If enabled, Connect will process any missing software updates for each SCCM computer and add the corresponding data to the Connect assessment service where it can be used by NAC to assess the end-system and generate Health Results. Disabled by default. |
| Max age for Software Updates | SCCM provides a ‘start date’ for each missing software update which indicates the date and time this update was available to the computer. Connect will calculate the difference from that start date till now (in nr of days) and if that difference exceeds the number configured through this option, Connect will set a higher risk value to the associated assessment test set and set the corresponding test set value to ‘Not Compliant’. This can be used to quarantine end-systems that haven’t installed software updates for x number of days. A configured value of 0 disables this feature. Default: 0 |
| Re-Assess end-systems due to changed software update status | If end-systems get assessed based on their missing software updates and there is a changed in compliance status (either it has been compliant before and is now non-compliant or vice versa) this feature will tell NAC to immediately re-authenticate and re-assess these end-systems. This will allow to ‘quickly’ quarantine end-systems that become non-compliant and get end-systems out of quarantine that previously have been non-compliant. Disabled by default. Only applicable if options ‘Enable assessment for software updates’ and ‘Max age for Software Updates’ are also enabled/configured |
| HTTP Socket Timeout | Timeout (in seconds) for the HTTP socket (connection) to the SCCM adapter. If you regularly see ‘Read timed out’ ERROR messages in your server.log then it might make sense to increase the default value for this config option. Default: 30 |
| HTTP Connect Timeout | Timeout (in seconds) for the HTTP connect to the SCCM adapter. If you regularly see ‘connect out’ ERROR messages in your server.log then it might make sense to increase the default value for this config option. Default: 30 |
Configure SCCM Adapter
The SCCM adaper is configured through its config file. If you followed the recommend folder structure, the file should be located here:
C:Program FilesExtreme NetworksSCCM AdapterConnectSccmAdapter.config
The file contains the following config options:
| Parameter | Explanation |
|---|---|
| PRE_SHARED_KEY | The pre-shared key is used to encrypt the data before sending it to the requesting Connect SCCM module. Ensure to configure the exact same pre-shared key as “password” within the Connect SCCM module config. To set / change this value, also ensure to set the IS_PRE_SHARED_KEY_ENCRYPTED config option to “false” so that the adapter processes the manually entered pre-shared key as clear text password. During the next iteration of the adapter it will store the new pre-shared key and update it within the config file in encrypted form. |
| IS_PRE_SHARED_KEY_ENCRYPTED | Tells the adapter whether the configured pre-shared key is currently provided in clear text or encrypted. You only need to change this value ( set it to “false”) if you want to change the pre-shared key and have to provide it in clear text. |
| SCCM_SERVER | The name or IP of your SCCM server. The adapter will need to provide this IP / name when running the Powershell commands. |
| SCCM_SITE_CODE | The SCCM site code. The adapter will need to provide this code / name when running the Powershell commands. The adapter will automatically pre-fix this configured value with “rootsmssite_” so there is no need to provide the full value – just the code itself is to be configured. |
| PORT | The TCP port which the adapter will use to start and run its web service. The Connect SCCM module running on your Extreme Management Server will need to be configured to connect to exactly this port so it can retrieve the SCCM computer data from the adapter. Ensure that no other service running on your SCCM server is using this port otherwise the adapter won’t be able to start. |
| SLEEP_INTERVAL | The time (in seconds) the adapter will sleep (pause) between iterations. It is recommended to set this value to 3600 (=one hour) or higher in order to keep the load on your SCCM server low. Only set this to lower values when you are testing or troubleshooting. |
| LOG_LEVEL | The adapter’s log level. Valid values are: DEBUG, INFO, WARN and ERROR. Use DEBUG for testing / troubleshooting only. Use WARN or ERROR for normal operation. |
| QUERY_SMS_G_SYSTEM_FOR_MAC_ADDRESSES | If enabled, will query MAC addresses from table SMS_G_SYSTEM in addition to querying them from table SMS_G_System_NETWORK_ADAPTER. Sometimes MAC addresses are listed in SMS_G_SYSTEM but not in SMS_G_System_NETWORK_ADAPTER - this feature will also import those MAC addresses. Those MAC addresses cannot be filtered by type so they will be imported without further validation. |
| RETRIEVE_DEVICE_SOFTWARE_UPDATES | If enabled, will retrieve pending (available but not yet installed) software updates (patches) for each managed computer in SCCM. This data can be used by Connect as assessment results for NAC/XMC. It will be visible in the ‘Health Results’ section per end-system and can also be used to quarantine end-systems. |
| NR_OF_PINGS_FOR_CONNECTIVITY_TEST_TO_RETRIEVE_SOFTWARE_UPDATES | When the feature to retrieve missing software updates is enabled, the adapter will run two actions before actually try to retrieve those software update data: a ping test and a WMI connectivity test. This config option allows you to configure the number of pings used within the ping test. Usually, one ping should be fine. If this is not enough in your network you can increase this number but be aware that the higher that number the longer it takes for connectivity tests and the longer the overall processing time to gather missing software updates. |
| POWERSHELL_TIMEOUT_RETRIEVING_SOFTWARE_UPDATES | Define the timeout (in seconds) for each Powershell command that tries to retrieve the next batch of missing software updates from all managed computers. If the configured timeout is reached, the underlying process is destroyed. Setting this value to 0 will disable any timeout but be aware that we have seen situations in customer environments where the WMI query hung up the powershell process forever! So it is recommended to actually configure this value properly. Be aware that you need to increase the timeout if you increase any of these two config parameters as they influence the overall processing time for the powershell command: –> NR_OF_COMPUTERS_TO_PROCESS_AT_ONCE_WHEN_RETRIEVING_SOFTWARE_UPDATES –> NR_OF_PINGS_FOR_CONNECTIVITY_TEST_TO_RETRIEVE_SOFTWARE_UPDATES If you keep the number of pings for the connectivity test to the default 1 and the batch size of computers to process at once at the default of 10 you should be fine with a timeout of about 100 seconds. |
Verification
The SCCM integration will perform two tasks with Extreme Control:
- Assign all MAC addresses from SCCM into one NAC end-system group
- Import computer data and populate it within the end-systems’ custom field
Verify Group Memberships
To verify the automatic group assignment of MAC addresses from SCCM within NAC simply go to OneView, open the end-system group you configured within the SCCM module and verify that your SCCM computer MAC addresses are populated with that group.
Verify Custom Data
To verify the custom data for SCCM managed end-systems logon to OneView and view the custom fields of those end-systems. Depending on which custom field you have configured within Connect o populate the SCCM data into, you should see data similar to this:

Troubleshooting
This section offers troubleshooting advice for problematic situations.
Adapter Functionality
Adapter Logging
The basic troubleshooting process starts with enabling DEBUG logging on the adapter side (on your SCCM server). That way, you can ensure that the adapter is running and is able to gather all required compuer data.
If you followed the recommend folder structure, the adapter’s config file should be located here:
C:Program FilesExtreme NetworksSCCM AdapterConnectSccmAdapter.config
Set the LOG_LEVEL to “DEBUG”, set the POLL_INTERVAL to 60 seconds (so you will results quickly) and save your changes. Now you need to restart the adapter. If you are running the adapter manually in a CMD or Powershell window, simply stop that process and restart it. If you run it automatically managed by the Windows Task Scheduler then use that tool to stop and restart the service.
After restarting the adper, wait a minute or two (depending on the size of your SCCM database, gathering all data may take anywhere from a few seconds up to a few minutes). Then open the log file located in the same (installation) folder and called
C:Program FilesExtreme NetworksSCCM AdapterConnectSccmAdapter.log
If you have a lot of logs, you will see multiple log files – the adapter generates up to 10 log files with each up to 50MB file size (this can also be tuned using the log4j.properties file). Validate whether you see proper computer data or any warnings or errors appear. If no errors nor warnings appear and all computer data is visible then move on to the next test step.
Adapter Web Service
Since you verified that the adapter is properly retrieving computer data from SCCM you will now need to verify whether the web service of the adapter is working and accessible from the Extreme Management Center.
Logon to your XMC (NetSight server) via putty and execute a call similar to this (adjust the NetSight IP and the port you have configured your SCCM adapter to run on):

If successful, this call will, by default, download the content from the SCCM adapter and save it in a file called index.html. You can open the file and validate whether it shows some content. The content will be encrypted but at least you know that the adatper’s web service is running and reponds to web requests. If the call to wget is not working properly there might be an issue with routing, firewalling or the port you have configured for the adapter to run on.
Connect SCCM Module Logging
Finally, you can enable debug logging for the Connect SCCM module within OneView to verify whether your issue exists within Connect:

After modifying the setting to DEBUG, hit the “Save” Button on top of the General Configuration area. Depending on your configured “Poll interval in seconds” you might have to wait a while before you actually see DEBUG logs within the XMC’s log file. If you don’t want to wait, you can restart the NetSight server in order for the change to take immedate effect (service nsserver restart).
The server.log can be found here:
/usr/local/Extreme_Networks/NetSight/appdata/logs/server.log