Amazon Web Services
Abstract: This document details the requirements, methodologies, and tools required to integrate Amazon Web Services with Extreme Networks Management Center.
Contents
Introduction
This integration provides automation and enhanced security regarding AWS EC2 instances and security groups. Main use cases:
- Manage AWS security groups through XMC (policies)
- Automatically assign AWS EC2 instances to managed security groups
- Import AWS instances to XMC
- Import virtual subnets as switches in XMC (topology)
- Provide reports on data retrieved from the Amazon cloud
Goals
- Import VM instances from AWS as end-systems into XMC
- Import
- AWS subnets to create XMC switches and
- AWS instance interfaces to create XMC switch ports
- Use this data on the created XMC switches to
- update the created switches’ nick name, location, contact and user data fields
- assign the switches to XMC sites
- update the created switch ports’ name and description fields
- Use this data on the created XMC end-systems to
- update the custom fields, state, authorization, device family, hostname, IP address
- map them to their connected switch (=AWS subnet) and port (=instance interface on that subnet) which also maps them to sites
- Manage security groups based on XMC policies
- Import security groups from so called managed VPCs (defined in Connect’s config)
- Compare to corresponding policies from so called managed Policy domains
- Create / update security groups based on policies / services / rules
- Manage EC2 instance assignment to security groups
- Based on manual XMC end-system group assignments
- Provide custom reports on networks, subnetworks, availability zones and instances
Prerequisites
Th following prerequisites are required:
Extreme Management Center
The minimum version required is XMC v8.2 (some features, like assigning devices and end-systems to sites require XMC v8.3)
The NMS-ADV (advanced) license must be deployed to enable this and other Connect integrations
- Internet access(Connect is running on the XMC server and needs access to the AWS cloud)
Amazon Web Services Account
Integration Overview
The overall architecture is centered around the XMC policy domain. Customers can create a dedicated policy domain with policies, service and rules that they want to use to protect their virtual instances. The Connect module’s configuration must mention this policy domain as so called managed domain and must map it to one or more AWS accounts and VPC networks.
Once this domain gets enforced, Connect will
- compare the policy rules with the existing security groups within the configured account’s network
- convert policy rules to security group rules and create / update security groups as needed
- Create / update XMC end-system groups for each managed domain &
policy
- Group name format: policyDomain__policyName
- Once an admin assigns an XMC end-system to one of the managed groups, Connect will assign the corresponding security groups to the corresponding AWS instance in the cloud to actually apply the corresponding security group rules.

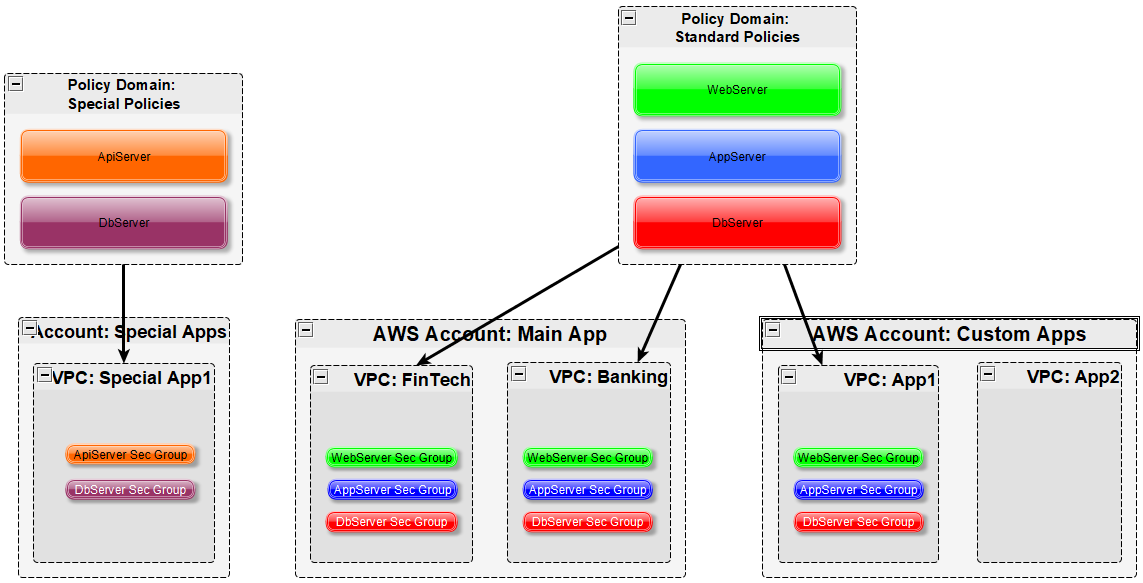
Multi-Account Support
The integration supports synchronization with multiple AWS accounts. Connect will pull all instances from all configured AWS accounts into XMC. It will synchronize the configured list of managed Extreme policy domains to the configured list of AWS VPC networks (configurable per account).
The visualization below shows a setup where two policy domains are created. One provides a set of standard policies that is synchronized to two AWS cloud accounts. Not all VPC networks in those two accounts receive those policies though. The other policy domain provides a set of special policies which is only synchronized into (a different) one AWS account.
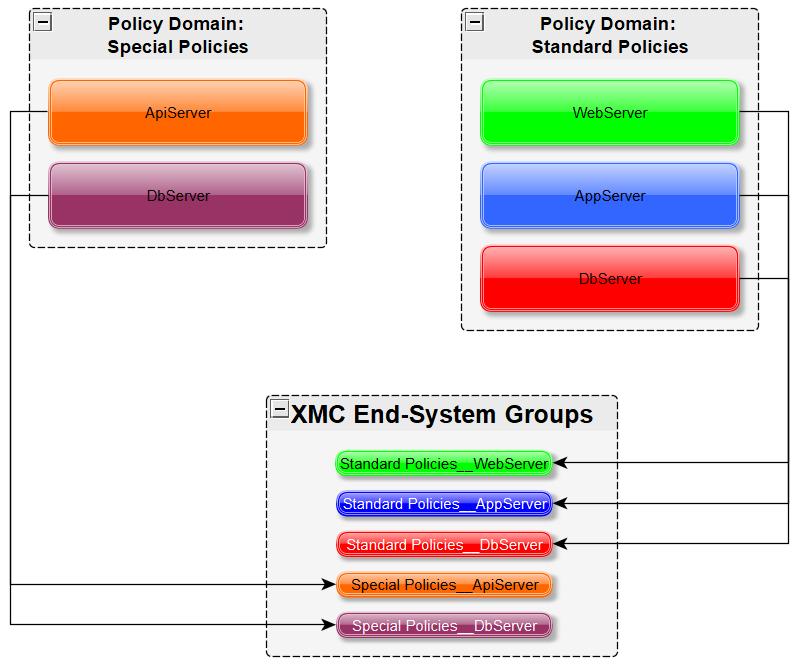
Managed Domains, ES Groups & Security Groups
The minimum configuration for this solution requires the admin to define at least one so called managed policy domain and map it to at least one account and VPC network (within that account). A managed policy domain is just a standard policy domain within XMC – it becomes a managed one by adding it to this Connect module’s configuration.
Connect is actually not managing (modifying) the policy domain. Only the XMC admin is modifying it. But such domains are used by Connect to
- Create XMC end-system groups for each policy
- Create AWS security groups for each policy within the list of configured VPC networks
Those auto-created XMC end-system groups and AWS security groups are considered managed as they can be created, updated and deleted by Connect. They should not be modified manually.
In regards to managed XMC end-system groups, Connect will only create one end-system group for each managed policy domain and contained policy. No matter how many accounts are being synchronized. The reason for that is that those end-system groups represent exactly one policy and even if that policy is exported to multiple accounts, it is still representing the same policy.
Mapping Domains to VPC Networks
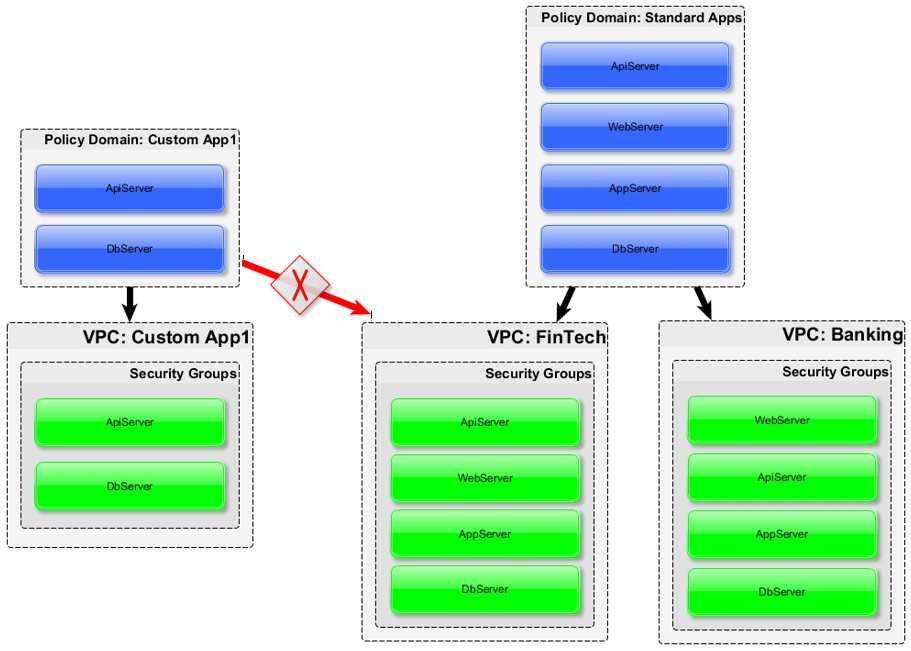
When configuring how to map a managed domain to a VPC network in AWS the following rules apply:
- One managed policy domain is mapped / exported to one or more VPC networks
- No VPC network can be assigned to more than one policy domain
- Policy domains that are not configured within Connect won’t be sync’ed to AWS
- VPCs that are not configured within Connect won’t be altered (“unmanaged” VPCs)
- Customers can manually create additional security groups in “managed” VPC networks
- Changes to “managed” security groups will be overwritten on next policy enforce
The image below visualizes valid and invalid configurations:
- Valid:
- Map policy domain “Custom App1” to VPC network “Custom App1”
- Map policy domain “Standard Apps” to two VPC networks
- this will create the exact same security groups within both VPC networks
- very useful for rules that you want to apply to all / most of your VPC networks as they apply some basic set of common rules
- avoids config errors especially when the same rules have to be managed for many VPC networks
- Not valid:
- The red arrow indicates a config error since the destination VPC network “FinTech” is already a managed network from the “Standard Apps” policy domain. A VPC network cannot be “fed” by more than one policy domain.
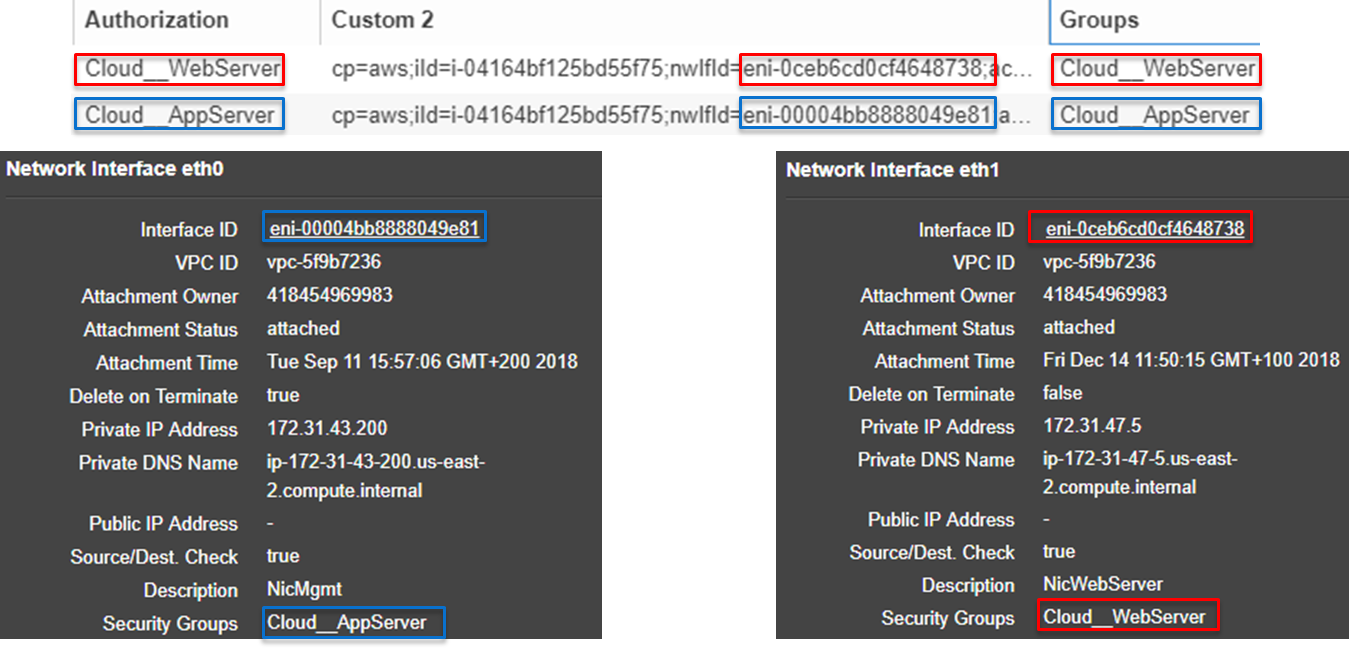
VMs with multiple Interfaces
AWS allows you to create a VM with multiple NICs. This allows Connect to apply different security groups for each interface of such a VM.
The image below shows two XMC end-systems which belong to a single AWS VM Connect creates an XMC end-system for each NIC on an AWS VM. Based on the different group assignment in XMC (one end-system is assigned to group Cloud__WebServer and the other to group Cloud__AppServer) the corresponding security groups are applied per instance interface in AWS.
Naming Convention
When creating XMC end-system groups and AWS security groups, Connect is following these naming conventions.
Security Group Name & Description
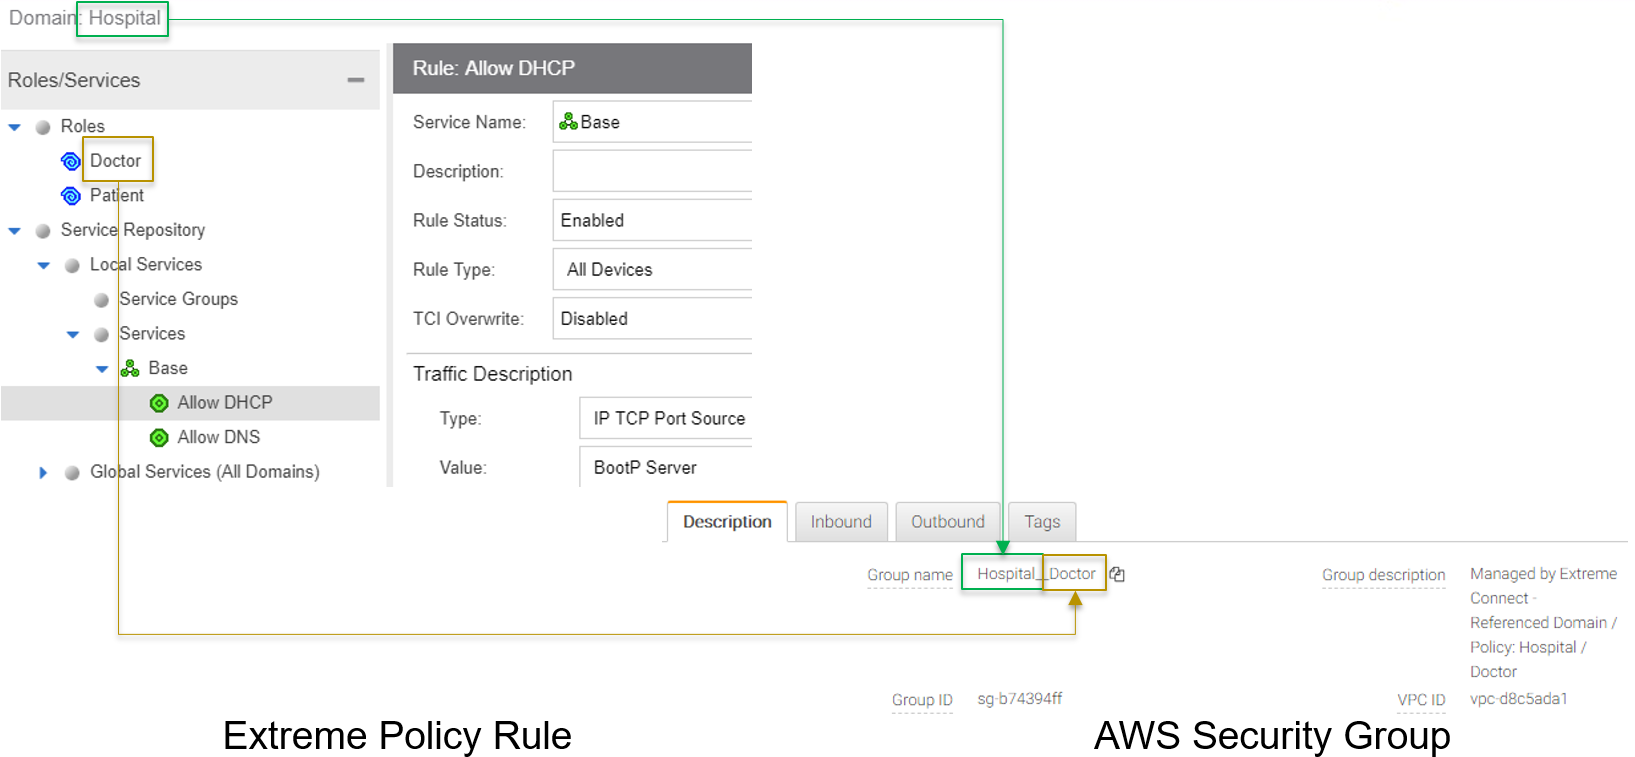
The name of each managed security group uses this syntax: extremePolicyDomain__extremePolicy
Example: Hospital__Doctor
AWS is not using the name of a security group as its unique identifier so it is allowed to use the same names on different VPCs (Connect will never create the same security group name within the same VPC). The security group ID is its identifier and is auto-generated by AWS when a new group is created.
Connect is also setting the description field of all managed groups. The description is not used by Connect and is more meant to be useful for admins to understand that those groups are managed by Connect and should not be edited manually. Example: Managed by Extreme Connect - Referenced Domain / Policy: Hospital / Test
This visualization shows an example of a security group name and how it is built based on the corresponding XMC policy.
Security Group Tag
Connect will add two tags to each managed security group it creates:
- Name: this is just to indicate the name of the group and has no further use
- ExtremePolicyId: this tag is a key identifier used by Connect. Each AWS security group that contains this tag is considered a managed group by Connect. Ensure not to delete or modify this tag manually. It encodes the policy domain and the policy name that it is based on (= that is refers to)
Example ExtremePolicyId tag: Hospital__Doctor
This tag is eventually used by Connect to identify the correct security group to be applied to an instance.
This visualization shows an example of the security group tags and how they are built based on the corresponding XMC policy.

Extreme End-System Groups
Each managed Extreme end-system group’s name will use this syntax: extremePolicyDomain—-extremePolicy
Example: Hospital__Patient
These end-system groups represent a specific policy you want to apply to a cloud-based instance (which is represented by an end-system in XMC). The description field lists the accounts and VPC networks that this end-system group is used for. Example:
Managed by Connect for AWS accounts and VPCs: VPCs for account id snappy-bucksaw-168120: [datalab-network], VPCs for account id analytics-research-199618: [kurt-vpc-1, kurt-vpc-2]
This example also shows that it is a valid configuration to synchronize one policy domain into multiple AWS accounts and even multiple VPC networks within a single account.

Sites
Manage XMC Sites
Once enabled, this integration will automatically create the site location
/World/Cloud
This site node will contain all devices that are retrieved from any cloud provider (AWS, Azure and GCP). Beneath the main node, the node that will hold all AWS related devices is created automatically
/World/Cloud/AWS
This is how it looks like in the UI if all three Cloud integration have been enabled:

Assign Devices
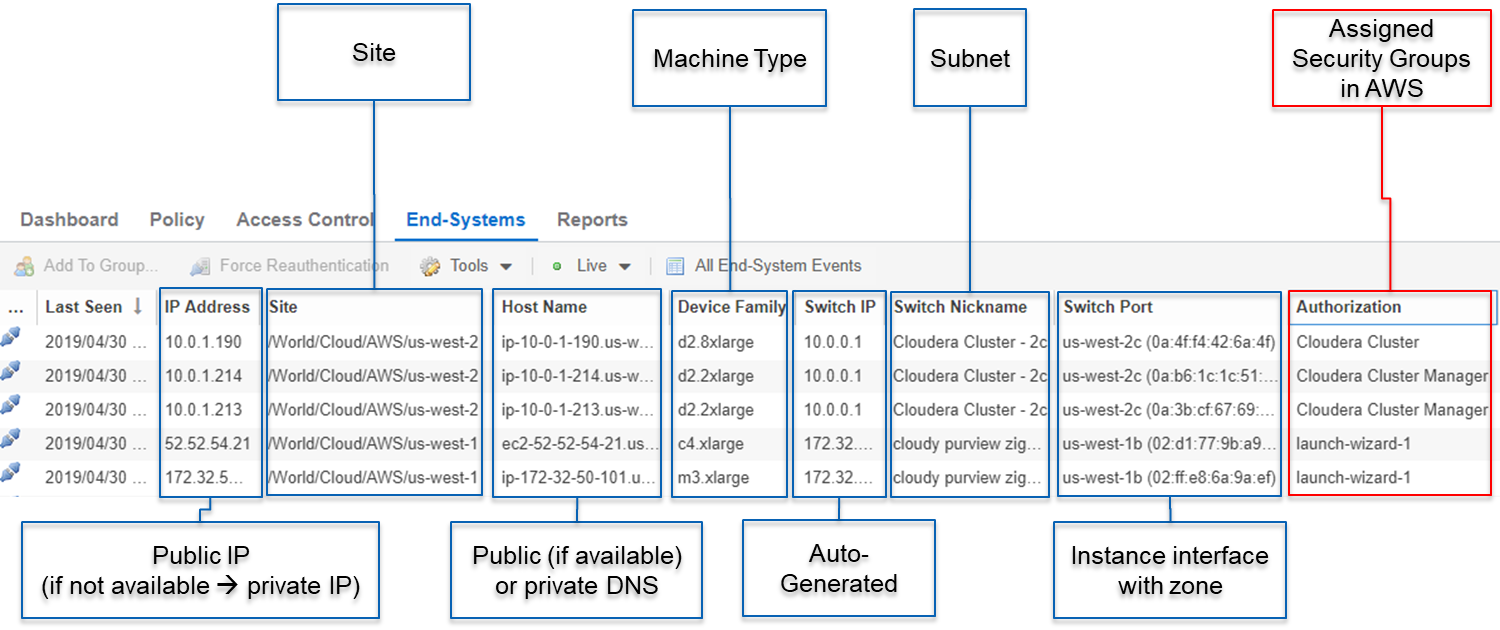
When the user clicks on the /World/Cloud/AWS list item the list of all retrieved AWS regions will be displayed as sub-sites and the list of all devices will automatically be filtered for those coming from AWS. Each device will show the site it belongs to:

Assign End-Systems
Since the end-systems are assigned to a switch and that switch belongs to a site, end-systems automatically are assigned to the corresponding sites as well ( the AWS region they run in).
Topology - XMC Devices (Switches)
Connect will create one device (switch) in XMC for each subnet found in AWS (from all configured accounts). Connect will then create one switch port for each instance interfaces that is connected to an AWS subnet. Those switches and ports will then be used to virtually “connect” the end-systems (instances) and thus provide a sense of “location” for each AWS instance.
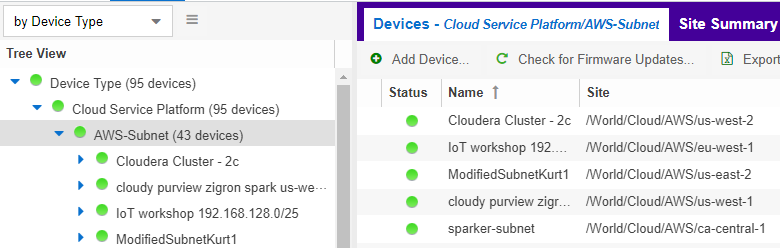
Creating Devices
The screenshot below shows a section of XMC devices that have been created based on AWS subnets and some of the corresponding AWS subnets.
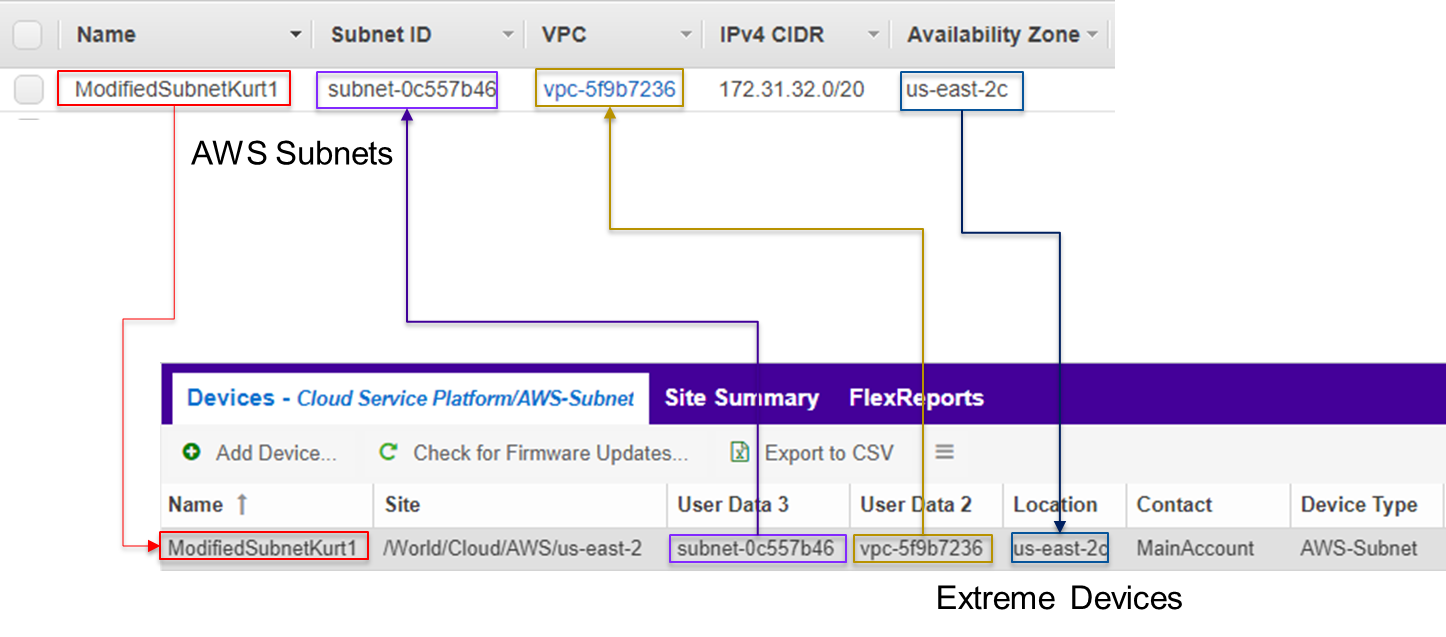
Before trying to create switches, Connect pulls the current list of switches from XMC and tries to parse data from their nick name, location, contact and user data fields. Data encoded here:
Nick name:
- if the subnet has a “Name” tag defined in AWS, that is what will be used.
- If not, the AWS subnet id is used
Site: the XMC site location of the device region of the subnet
Location: Zone name of the subnet
Contact: Account name id (that this subnet is pulled from)
- User Data 1: always shows cp=aws( reference that this device originates from AWS)
User Data 2: AWS VPC id
User Data 3: AWS subnet id
These fields should never be modified manually!
After creating the switch, Connect will create a switch port for each instance interface that is connect to this subnet.

Connect will encode data within the following switch port fields:
- Name:
- MAC address of the instance interface
- Description:
- Instance name
- instance id
These fields should never be modified manually!
Autogenerate Switch IP
The IP addresses are automatically generated based off of the CIDR range provided by AWS for each subnet. Since AWS allows you to have the same subnet (with the same CIDR range) in multiple regions, the switch IP is auto-incremented starting at the first IP within the given CIDR range.
The auto-generated switch IP addresses are not relevant (they are not accessible and cannot be used by XMC to talk to any AWS switch) but need to be provided to XMC.
Removing / Resyncing XMC Devices
If a subnet in AWS gets deleted, the corresponding XMC switch will be deleted as well.
If an XMC device that corresponds to a (still existing) AWS subnet get deleted (for example: by accident through the admin) Connect will re-create this switch.
Updating XMC Switch Ports
If a new instance interface is connected to a subnet in AWS, the corresponding XMC switch will get a new switch port. And if an existing instance interface is removed from a subnet in AWS, the corresponding switch port in XMC is removed.
XMC End-Systems
Creating End-Systems
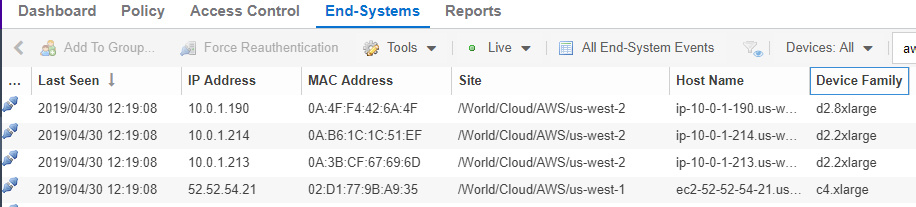
This integration will create an end-system entry in XMC for each AWS instance’s network interface.
The following list shows the attributes mapping from AWS instances to XMC end-systems
- XMC end-system hostname and IP address:
- AWS intance’s NIC’s “association” attribute: use Public DNS and IP if provided
- XMC end-system device family:
- AWS instance type
- XMC end-system state:
- AWS state. If it is RUNNING Connect maps it to ACCEPT. For everything else: DISCONNECTED
- XMC end-system switch IP:
- AWS subnet
- XMC end-system switch port:
- AWS instance interface. Also shows zone and interface MAC
All end-systems will be shown in XMC as discovered through “Auto-Tracking”. By assigning end-systems to the corresponding switches, they will also be assigned to the corresponding site.
Updating End-Systems
The Connect module holds a cache of already synchronized end-systems in order to avoid having to recreate all end-systems during each poll interval. So if an AWS instance is already on that cache, tests will be executed on the following end-system properties before an update message is sent to the XMC API:
- IP address (network interface IP – preferred: public IP)
- Hostname (network interface DNS name – preferred: public DNS name)
- Switch IP (if the feature to sync AWS subnets to XMC devices is enabled)
- State
- Authorization
In case any one of these tests show that an update is required, Connect will update the corresponding end-system in XMC.
Updating Custom Field
The Connect module is updating two custom fields for each end-system/instance imported from AWS:
One custom field contains general data about the corresponding instance. The content and syntax of this custom field can be modified through a configuration option but modifying it will most likely make the reports unavailable. The following data / variables are available:
- Available variables from an instance (which the interface belongs to):instanceId, instanceState, instanceType, instanceName, tags
- Available variables from the instance interface:mac, interfaceId, interfaceStatus, vpcId, subnetId, subnetName, publicIpAddress, privateIpAddress, ipAddress, publicDnsName, privateDnsName, description, securityGroups
The default config for this parameter is:iName=#instanceName#;iStatus=#instanceState#;nwIfNetwork=#vpcId#;nwIfSubnet=#subnetName#;iZone=#availabilityZone#;nwIfIp=#ipAddress#;iType=#instanceType#
- Another custom field contains data that is used to identify the AWS instance, its interface and the account name belongs to. Do not manually modify the content of this custom field! Example content:cp=aws;iId=i-0b4845152d087a585;nwIfId=eni-216dc071;accName=MainAccount;vpc=vpc-f2ad7195
That data can be used to search and filter for end-systems.
Removing End-Systems
This section describes the mechanisms available to handle end-systems that have been removed/deleted/aged from AWS and thus don’t appear in the result list retrieved via the AWS API.
The following actions can be taken (all configurable):
- Move deleted end-system to “deletion” group: admins can configured a so called “deletion” group on the Connect module. Once an already synchronized instance has been deleted from AWS, its corresponding MAC address will be deleted from any end-system group in EAC and added to this end-system group. Administrators could use this group to track which end-systems are now “outdated” according to AWS.
- Delete end-systems from XMC: delete the end-system using its MAC. This won’t remove any group memberships but will delete the end-system from XMC / NAC
XMC End-System Groups
Connect uses XMC end-system groups (MAC-based) for two purposes:
- A catch-all group can be configured to put all instance MACs into a single end-system group for awareness – admins can use this group for easy search, grouping and filtering
- For each managed policy (from all managed domains), Connect creates an end-system group. When an end-system MAC gets added to such an end-system group the corresponding AWS instance will get assigned to the corresponding security group. That way, pushing XMC end-systems to groups will enforce security groups in AWS.

If those end-systems get added to MAC groups that are not managed by Connect, no change to the corresponding instances’ security group assignment will be performed.
If you configure a valid (existing) MAC-based end-system group for this feature (“Default endsystem group for all instances”) be aware that,
- if you manually delete entries from this group and
- you have the feature “Assign AWS security groups based on xmc end-system groups” enabled and
- you have the feature “Overwrite manual security groupassignment” enabled
Connect will remove any previously, manually configured security group assignment from the corresponding AWS instance which might lead to communication issues with that instance. Connect will only keep automatically assigned security groups on that instance and if the corresponding end-system has only been in that default catch-all group and now is not member of any group, Connect will remove all security group assignments from that instance (apart from the default security group from its VPC) which might impact its connectivity.
Installation and Configuration
First confirm that Extreme Management Center (XMC) is installed.
AWS API Access
To retrieve any data from this API, the following parameters are required:
- Access key id
- Access key secret
- Default region
You can generate the access key and secret access key by following these directions:
http://docs.aws.amazon.com/IAM/latest/UserGuide/ManagingCredentials.html#Using_CreateAccessKey
Ensure that the user you base this API access key off of has sufficient permissions to use the API, manage security groups, managed security groups assigned to instances and pull data on security groups, instances, zones, subnets and managed security groups.
Here is a short abstract from the AWS documentation on how to create an access key and secret:
To create, modify, or delete a user’s access keys (console)
- Sign in to the AWS Management Console and open the IAM console at https://console.aws.amazon.com/iam/.
- In the navigation pane, choose Users.
- Choose the name of the preferred user, and then choose the Security credentials tab.
- If needed, expand the Access keys section and do any of the
following:
- To create an access key, choose Create access key. Then choose Download .csv file to save the access key ID and secret access key to a CSV file on your computer. Store the file in a secure location. You will not have access to the secret access key again after this dialog box closes. After you have downloaded the CSV file, choose Close.
- To disable an active access key, choose Make inactive.
- To reenable an inactive access key, choose Make active.
- To delete an access key, choose its X button at the far right of the row. Then choose Delete to confirm.
AWS Default Region
The default region is required for some API calls (that are not region specific) and is set to “us-east-1” by default.
All available regions: https://docs.aws.amazon.com/AWSEC2/latest/UserGuide/using-regions-availability-zones.html

Configure Connect
Configuration can be done both from the XMC tab “Connect” and the config file itself.
Customers should not have to use the config file but it is mentioned just for documentation purposes. On an XMC v8.1 server it is located at /usr/local/Extreme_Networks/NetSight/wildfly/standalone/configuration/connect /AwsHandler.xml
Customers will use the XMC web UI for configuration.
AWS Account Specifig Config
The first tab within the “Amazon Web Services” Connect module config section allows admins to configure AWS account specific information:
- Account Name:this is a freely configurable name for each AWS account you want to synchronize to. The name is simply for the customer to be able to know which instances belong to which account. It is not part of the AWS API authorization.
- Access Key ID:Used to authenticate and authorize Connect against the AWS API (see chapter above to create a key)
- Access Key Secret:Used to authenticate and authorize Connect against the AWS API (see chapter above to create a key secret)
- Managed Domains and VPCs:List of managed policy domains and their corresponding managed VPCs. Only policy domains configured here will be used to export policies to AWS. One policy domain can be mapped to one or more VPCs. No VPC can be assigned to more than one policy domain. The managed domains and VPCs must be given in the following format: domainName:vpcId1,vpcId2;domainName2:vpcId5,vpcId7. Example: Hospital:vpc-d8c5ada1
- Default Region:Used when creating new security groups. The AWS API requires to set a default region on this operation. Default value: us-east-1
All available regions: us-gov-west-1, us-east-1, us-east-2, us-west-1, us-west-2, eu-west-1, eu-west-2, eu-west-3, eu-central-1, ap-south-1, ap-southeast-1, ap-southeast-2, ap-northeast-1, ap-northeast-2, sa-east-1, cn-north-1, cn-northwest-1, ca-central-1
- Regions to ignore:Semicolon separated list of region names that should be ignored when retrieving any data from AWS. Tests have shown that some regions seem to have special authorization and usually (for most enterprise customers) produce errors when trying to query them (China, government). If empty, Connect will try to retrieve data from all regions.
All available regions: us-gov-west-1, us-east-1, us-east-2, us-west-1, us-west-2, eu-west-1, eu-west-2, eu-west-3, eu-central-1, ap-south-1, ap-southeast-1, ap-southeast-2, ap-northeast-1, ap-northeast-2, sa-east-1, cn-north-1, cn-northwest-1, ca-central-1
Example (and default value): us-gov-west-1;cn-north-1;cn-northwest-1

General Config
The second tab within the Connect “Amazon Web Services” module configuration section is called “Configuration” and provides more options. Most of them are similar to all other modules and thus won’t be discussed in detail within this document. Some important options are:
- Custom field to use for identification data:The number of the custom data field for each end-system to store the identification data to. This data is used to identify the corresponding AWS instance, network interface and account name. It also encodes the type of cloud provider used to pull this data from (in this case: aws). Format example: cp=aws;iId=4253868206409840076;nwIfFp=u7wnZ-pBoYg=;accN=analytics-research-199618
This value must not be the same as the configured value for “Custom field to use”!
- HTTP client socket timeout in milliseconds:HTTP socket timeout in milliseconds for all HTTP connections to the AWS API. Defines how much time is allowed for the socket towards the AWS API to be unresponsive. Default: 50000 (=50 seconds)
- HTTP client connection timeout in milliseconds:HTTP connection timeout in milliseconds for all HTTP connections to the AWS API. Defines how much time is allowed for Connect to open up a socket to the AWS API. Default: 10000 (=10 seconds)
- Sync Policies with AWS Security Groups:When set to true, Connect will synchronize (export) the policies from all ‘managed’ policy domains to AWS security groups. It will create one security group for each policy from each ‘managed’ XMC policy domain.
- Sync Policies with XMC end-system groups:When set to true, Connect will synchronize the policies from all managed policy domains to XMC end-system groups. It will create one end-system group for each policy from each managed XMC policy domain.
- Assign AWS security groups based on XMC end-system groups:When set to true will assign EC2 instances interfaces to AWS security groups based on the end-system groups that the corresponding end-system is assigned to in XMC/EAC. The mapping between EC2 instance interface and XMC end-system is based on the MAC address
- Overwrite XMC end-systems’ Device Family with instance machine type:If enabled, uses the instance type from AWS to overwrite the device family field for imported end-systems in XMC.
- Create switches in XMC for AWS Subnetworks:If enabled, imports all subnets from AWS and tries to create one managed device (switch) per subnet in XMC.
- Delete end-systems from XMC that have been deleted from AWS:If enabled, deletes the corresponding end-system from XMC if a AWS instance has been deleted. This actually deletes the end-system entry from NAC’s end-system list - not only the MAC address from any group!
- End-system group for deleted AWS instances:If an instance or any of its network interfaces get deleted in AWS their corresponding end-systems will be pushed to this end-system group
- Remove end-systems from other groups on decommission:Enable this to remove a device from all other groups when it is moved to the decommission group
- Regularly auto-enforce policies to AWS:When enabled, Connect automatically verify whether the “managed” policy domains are correctly synchronized to the configured VPCs. This will ensure that your policy configuration is kept consistent with your security groups within AWS even is someone manually changes those “managed” security groups in AWS
- Regularly auto-enforce:When enabled, Connect automatically verify whether the “managed” policy domains are correctly synchronized to the configured VPCs. This will ensure that your policy configuration is kept consistent with your security groups within AWS even is someone manually changes those “managed” security groups in AWS
Alarm and Event Messages
This chapter lists all customer visible event messages within XMC’s “Alarms & Events” tabs. This Connect module doesn’t generate any alarms but only events. If you want to elevate some of those events to alarms and trigger additional actions, please use the Alarm Configuration feature within XMC.
Policy Verification
There are four types of events generated when Connect verifies policy domains with AWS security groups and XMC end-system groups.
Started Policy Verification with AWS
This event is triggered when the verification process is kicked off. This can occur manually through a domain verify or domain enforce (the verification is done automatically prior to enforcing) or automatically on each module poll cycle (when feature Regularly auto-enforce policies to AWS is enabled).

Started Policy Verification with XMC End-System Groups
This event is triggered when the verification process is kicked off. This can occur manually through a domain verify or domain enforce (the verification is done automatically prior to enforcing) or automatically on each module poll cycle (when feature Regularly auto-enforce policies to XMC End-System Groups is enabled).
Example:

Finished Policy Verification with AWS
This event is triggered when the verification process is finished. It will show the results of the verification.
Example 1: no change required:

Example 2: A new policy (containing two rules) has been created on XMC but has not yet been sync’ed to AWS. This policy is missing in the configured managed AWS VPC network:

Finished Policy Verification with XMC End-System Groups
This event is triggered when the verification process is finished. It will show the results of the verification.
Example 1: no change required:

Example 2: A new policy has been created on XMC but has not yet been sync’ed to an XMC end-system group:

Policy Enforcement
There are four types of events generated when Connect enforces policy domains with AWS security groups and XMC end-system groups.
Started Policy Enforcement with AWS
This event is triggered when the enforcement process is kicked off. This can occur manually through a domain enforce or automatically on each module poll cycle (when feature Regularly auto-enforce policies to AWS is enabled).
Example:

Started Policy Enforcement with XMC End-System Groups
This event is triggered when the enforcement process is kicked off. This can occur manually through a domain enforce or automatically on each module poll cycle (when feature Regularly auto-enforce policies to XMC End-System Groups is enabled).
Example:

Finished Policy Enforcement with AWS
This event is triggered when the enforcement process is finished. It will show the results of the verification.
Example 1: no change required:

Example 2: A new policy (containing two rules) has been created on XMC Connect created 1 new security group within AWS:

Finished Policy Enforcement with XMC End-System Groups
This event is triggered when the enforcement process is finished. It will show the results of the verification.
Example: A new policy has been created on XMC and has been enforced to an XMC end-system group. The name of that new end-system group is provided within the event text:

Security Group Assignment
Whenever an XMC end-system that corresponds to an AWS instance is assigned to / removed from a managed XMC end-system group then the corresponding instance get its assigned security groups updated (to enforce the corresponding policy). To reflect that action, the following event is being logged:

Viewing Data
This section provides information on where to find the data imported from AWS within XMC.
Viewing Device Data
The devices that are automatically created for each AWS subnet will contain the following data:
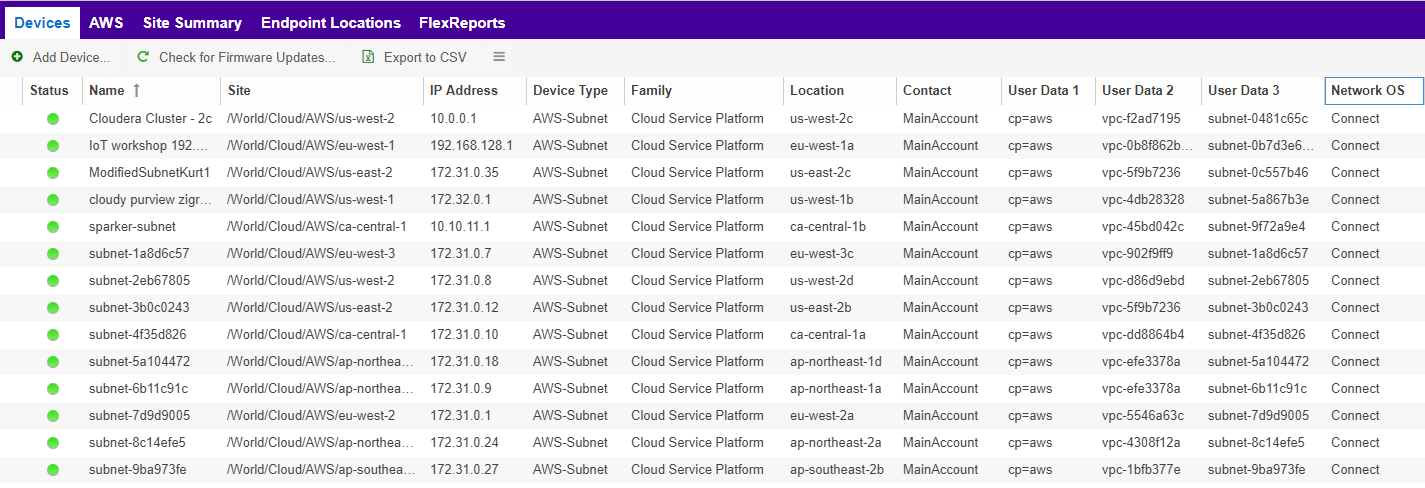
Name: if the subnet has a “Name” tag defined in AWS, that is what will be used. If not, the AWS subnet id is used
Site: the XMC site location of the device region of the subnet
IP address: auto-generated IP that is NOT the real IP of that subnet!
Device Type: always shows AWS-Subnet
Family: always shows Cloud Service Platform
Location: zone that the subnet runs in
Contact: user configured name of the AWS account which holds this subnet
- User Data 1: always shows cp=aws( reference that this device originates from AWS)
User Data 2: AWS VPC id
User Data 3: AWS subnet id
Network OS: always shows Connect
You can easily filter the list of devices per region by sorting the list of devices by “Sites” and then clicking on the region name you want to filter for:

Viewing End-System Data
Within the end-system table you should see data on all end-systems that are based on imported AWS instances (from the configured accounts) within the two configured custom fields. In this example screenshots the default custom1 is used for general instance data and custom2 for identifying AWS data.
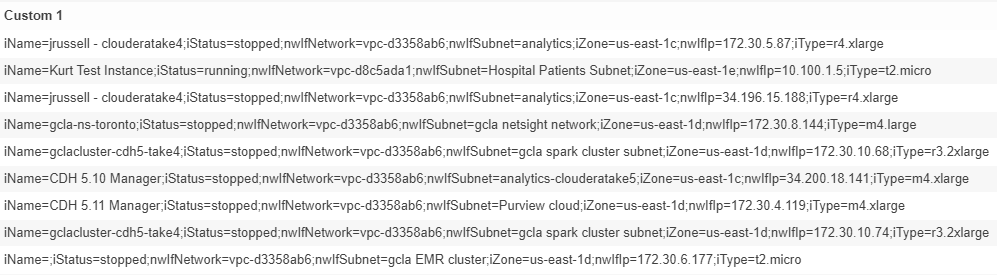

You will also be able to see the current status, IP address, site, hostname (public or private DNS name), device family (machine type), switch IP, switch nick name (AWS subnet) and port (zone & MAC of instance interface) within the standard table columns. The “Authentication Type” will always be set to “Auto-Tracking” to indicate the source of this data.
Cloud Reports
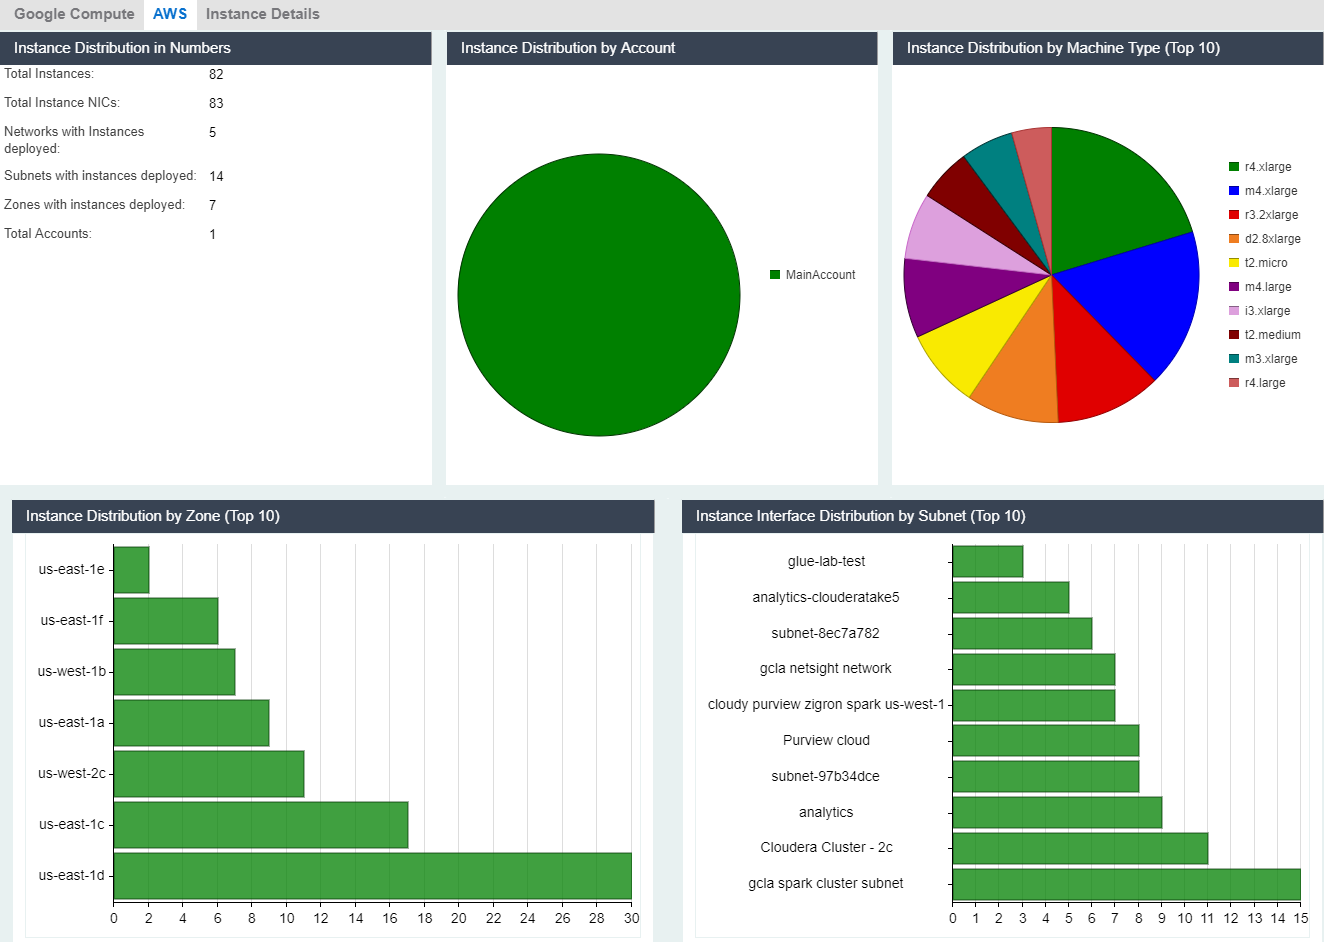
Introduced with XMC v8.2, the AWS cloud report is part of the new “Multi-Cloud” dashboard within XMC’s “Network” area.
AWS Stats Report
The AWS specific Cloud Reports shows:
- Statistics
- Instance Distribution by AWS Account
- Distribution of VMs per machine type (top 10)
- Distribution of VMs per zone (top 10)
- Distribution of VM interfaces per subnets (top 10)
Instance List Report
The report shows the list of all AWS instances with some details on each VM:

Published: May 2019
© 2012–2014 Extreme Networks, Inc. All Rights Reserved.
AccessAdapt, Alpine, Altitude, BlackDiamond, Direct Attach, EPICenter, ExtremeWorks Essentials, Ethernet Everywhere, Extreme Enabled, Extreme Ethernet Everywhere, Extreme Networks, Extreme Standby Router Protocol, Extreme Turbodrive, Extreme Velocity, ExtremeWare, ExtremeWorks, ExtremeXOS, Go Purple Extreme Solution, ExtremeXOS ScreenPlay, ReachNXT, Ridgeline, Sentriant, ServiceWatch, Summit, SummitStack, Triumph, Unified Access Architecture, Unified Access RF Manager, UniStack, XNV, the Extreme Networks logo, the Alpinelogo, the BlackDiamond logo, the Extreme Turbodrive logo, the Summit logos, and the Powered by ExtremeXOS logo are trademarks or registered trademarks of Extreme Networks, Inc. or its subsidiaries in the United States and/or other countries.
sFlow is the property of InMon Corporation.
Specifications are subject to change without notice.
All other registered trademarks, trademarks, and service marks are property of their respective owners.
For additional information on Extreme Networks trademarks, see www.extremenetworks.com/company/legal/trademarks.