JAMF Casper
Abstract: This document details the requirements, methodologies, and tools required to integrate JAMF’s Casper solution with Extreme Networks Management Center.
Contents
Introduction
Combining Extreme Networks Control (NAC) solution with JAMF’s Casper solution allows network and security administrators to ensure that only managed and updated devices are able to use the network and its resources. Devices which are out-of-date can be quarantined. The solution also allows to automatically assign end-systems to groups in Extreme Control that correspond to groups in Casper. This allows administrators to manage device groups in Casper and use the same groups in Extreme Control to automatically and dynamically assign the corresponding authorization profiles.
Prerequisites
To utilize the full power of the Casper integration, the following prerequisites are required:
Solution Components:
- Extreme Management Center (NetSight):The minimum version required is NetSight 6.3
Extreme Connect: Needs to be installed and running on the Extreme Management server. With Extreme Management 7.0 all Connect integrations (including the Casper integration) are installed and updated automatically.
Extreme Control (NAC): Needs to be deployed and fully functional with minimum version of 6.3.
User account to access the JAMF Casper API
Licensing:
- NMS-ADV (Advanced License): In order to use the Extreme Connect
- solution, the advanced license needs to be installed on the Extreme Management server.
Integration Overview
The graphic below highlights the major components necessary for this integration to work and the benefits it provides.
- Hardware: Any switch or WLAN solution that can perform RADIUS authentication for network devices and is supported by Extreme’s NAC solution
- Software Products: Extreme Networks Management (NetSight) and Control (NAC) solution need to be deployed on top of the network infrastructure. Ensure the end-systems which are managed by Casper are also connected through wired/wirless ports where RADIUS authentication via NAC is implemented.
- Extreme Connect: This element will need to be installed by your Extreme Networks representative or certified partner if you are running a Management Center version prior to 7.0. Starting with 7.0, all Connect modules are integrated with Management Center and thus automatically deployed as soon as an Advanced license is available. Both the CasperHandler and ExtremeControlHandler are required at minimum for this integration to work. More benefits are achieved by also utilizing the Assessment Adapter which also is part of the Connect installation.
- Benefits:
- End-System Group: Automatic grouping of devices managed in Casper within NAC improves visibility and operational processes. An administrator can utilize the Casper end-system groups within Extreme Control to assign fine grained policy authorization.
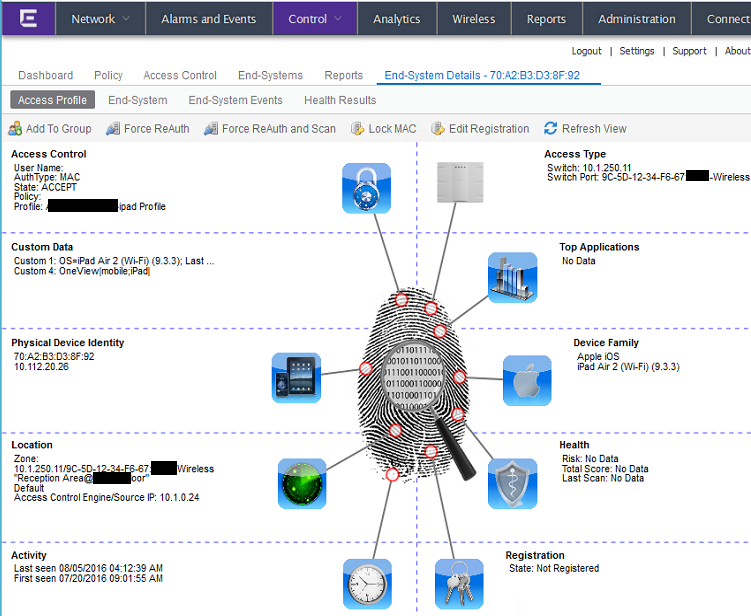
- Custom Data: Automatically augments NAC’s database with detailed device information from Casper like the operation system version, asset tag, user name, user email, serial number and more. Administrators and help desk staff can use OneView as a single pain of glass to get a deep insight into end-system data.
- Username: Populates the username retrieved from Casper within NAC. This provides user context to NAC without the need to enable 802.1X authentication mechanisms. This feature can also be disabled and should also be disabled if 802.1X is used to authenticate the end-systems managed through Casper.
- Device Type: Populates the more granular and reliable operating system information retrieved from Casper within NAC.
- Quarantine: automatically quarantine end-systems which have an out-dated last inventory update timestamp (configurable number of days). This prevents out-of-date and thus potentially infected end-systems to effect and harm other end-systems or network resources.
Installation and Configuration
First confirm that Extreme Management Center (NetSight), Extreme Control (NAC) and JAMF Casper are installed. Deploy the NAC solution on all LAN switches and WLAN SSIDs where you want to authenticate and authorize end-systems and integrate their data with Casper.
If you are running a Extreme Management version prior to 7.0: obtain the Extreme Connect installer, copy it to your NetSight folder and use the java provided within your NetSight installation folder to run the installer file. For details on how to install Connect please refer to the Connect installation guide or contact an Extreme Networks representative for guidance.
Once you successfully installed Connect you can use the Connect tab within OneView (Extreme Management Center 7.0 and above) or Connect’s management website (Extreme Management Center 6.3 or below) to configure the solution using your browser and navigating to:
Alternatively you can use the corresponding configuration files which can be found when login into your Extreme Management server using SSH and navigating to
/usr/local/Extreme_Networks/NetSight/jboss/server/default/conf/fusion/
After you have configured your Connect modules make sure to restart your NetSight server in order to activate Connect.
The following sections describe the configuration options offered in regards to the Casper integration.
Connect Config: Extreme Control

If you don’t want Connect to add all Casper managed devices to end-system groups in NAC disable the feature to “Add endsystems to endsystem groups”. Otherwise all device MAC addresses retrived from Casper will automatically be added to the corresponding NAC end-system groups.
If you want to automatically import the username for all devices retrieved from Casper into NAC you need to enable the following option: “Update Kerberos username for endsystems“. If Casper has no username associated with a device, then the existing username in NAC will not be overwritten/deleted. Be aware that the user information retrieved from Casper is not retrieved in real-time and can therefore not be used for user authentication and authorization in NAC. Enable this option only if you do not use any 1X authentication method and no authorization rules based on user names. The username retrieved from Casper should only be used as “additional data on an end-system”.
If you want to augment the device type detection within NAC by retrieving the operating system information from Casper you need to enable the following option: “Update devicetype for endsystems”. Since the quality of this data within Casper is usually very high, it is recommended to enable this option. But be aware that this feature will overwrite any other device type detection techniques used by NAC (DHCP, portal, etc.).
Connect Config: Casper
Since Extreme Management Center 7.0 the Extreme Connect user interface is fully integrated into OneView. Once you have an Advanced License applied, you should see a top-level tab named “Connect” within OneView. Within the Connect area, choose the Configuration tab and then the Administration tab below. Within the Administration area you can now choose the “Casper” module to configure the so called service first.
A “service” represents one Casper server you want to query. In theory, you could add (and thus query) multiple Casoe servers but in reality most customers will only have one Casper server. To configure the connection to the Casper server, adjust these available settings:
| Parameter | Explanation |
|---|---|
| server | IP Address of the Casper server |
| port | The TCP port of the Casper server |
| username | The username to authenticate on the Casper service. The provided user account must be authorized to use the API to retrieve end-system data. |
| password | The password the user Casper API user account. |
Next, move on to the “Configuration” tab where you can configure the following settings:
General Configuration
| Parameter | Explanation |
|---|---|
| Poll interval in seconds | The Casper module uses two kinds of synchronizations: partial and full. On a partial synchronization, the Connect Casper module only queries the list of computer / iPhone IDs and then only queries detailed data for any new IDs. This setting his the sleep time in between two synchronizations. On each synchronization, the Connect module will query the Casper server, process the retrieved data internally and then sleep for the configured amount of seconds. It is not recommended to query the Casper server more than every ten minutes (600 seconds). This might impose too much load on the Casper server and lead to crashes or instabilities. |
| Log level | The log level for this module. Each module logs into the standard EMC log file. It is recommended to set this to WARN or ERROR. Use DEBUG only for debugging / troubleshooting / testing. |
| Module enabled | Enables / disables this module |
| Update local data | Always keep this set to true. When set to false, the module won’t perform the data import and is thus useless. |
Specific Configuration
| Parameter | Explanation |
|---|---|
| Custom field | The Extreme Control end-system custom field where the Casper module will write its data to. You can choose between all four available end-system custom fields. Ensure that you don’t use the same custom field for any of the other Connect modules otherwise they will overwrite each other constantly. |
| Full Re-Sync Interval | The time after which a full data re-sync will be performed. This will also update data on device which are already synchronized. Example config: if you want to update new Casper devices quickly (every 10 minutes) but run a full synchronization of new and existing devices only every hour you can set these two config parameters accordingly: Poll interval: 600 Full Re-Sync Interval: 3600 |
| Format of the incoming data for iPhones | Format of the data that gets stored in the custom data field for iPhones/iPads Syntax example: OS Version=#osVersion#; Last Inv. Update=#lastInventoryUpdate#; Is Managed=#isManaged#; User=#userName#; Real Name=#realName#; Email=#email# Available Variables: name, ipAddress, mac, assetTag, osVersion, lastInventoryUpdate, isManaged, modelDisplay, userName, realName, email, serialNumber, isSecurityDataProtection, isSecurityBlockLevelEncryptionCapable, isSecurityFileLevelEncryptionCapable, isSecurityPasscodePresent, isSecurityPasscodeCompliant, isSecurityPasscodeCompliantWithProfile |
| Format of the incoming data for Computers | Format of the data that gets stored in the custom data field for computers (MACs) Syntax example: OS=#osName# (#osVersion#); User=#userName#; Real Name=#realName#; Email=#email#; Phone=#phone# Available Variables: name, macAddress, alternateMacAddress, osName, osVersion, ipAddress, userName, realName, email, phone, assetTag, serialNumber, lastInventoryUpdate, lastCheckIn, isRemoteManaged |
| Format of the incoming data for Advanced Computer Search computers | Format of the data that gets stored in the custom data field for “Advanced Computer Search” computers (MACs) Syntax example: OS=#osName# (#osVersion#); User=#userName#; Real Name=#realName#; Email=#email#; Phone=#phone# Available Variables: name, macAddress, alternateMacAddress, osName, osVersion, ipAddress, userName, realName, email, phone, assetTag, serialNumber, lastInventoryUpdate, lastCheckIn, isRemoteManaged |
| Default endsystem group for all iPhones | The default end-system group name to use if it is not set dynamically for all iPhones. Ensure that group exists in NAC and its description field field contains the text “sync=true”. |
| Default endsystem group for all computers | The default endsystem group name to use if it is not set dynamically for all computers. Ensure that group exists in NAC and its description field field contains the text “sync=true”. |
| End-system group for decommissioned devices | The default end-system group for decommissioned devices. End-systems which have been but are no longer managed by Casper will be pushed to this group if the feature “Remove device from other groups on decommission” is enabled. Ensure that group exists in NAC and its description field field contains the text “sync=true”. |
| Remove device from other groups on decommission | Enable this to remove a device from all other groups when it is moved to the decommission group (see config parameter “End-system group for decommissioned devices”) |
| Delete custom data in Netsight for decommissioned devices | If a device is deleted in Casper the end-system’s custom data field in NetSight will be cleared |
| Overwrite the existing username for iPhones/iPads with the one acquired from Casper | If set to “true” the username for iPhones/iPads retrieved from CASPER will overwrite the username which is already in NAC. If no username could be retrieved from CASPER for a given end-system, then no change is performed in NAC. Be aware that this might mess up existing NAC processes if you are already retrieving and using the username through some other mechanism like 802.1X or Kerberos snooping –> this will be overwritten! To get the user name within NetSight’s end-system you will need to
|
| Overwrite the existing username for MACs with the one acquired from Casper | If set to “true” the username for MACs retrieved from Casper will overwrite the username which is already in NAC. If no username could be retrieved from CASPER for a given endsystem, then no change is performed in NAC. Be aware that this might mess up existing NAC processes if you are already retrieving and using the username through some other mechanism like 802.1X or Kerberos snooping –> this will be overwritten! Also see additional information in “Overwrite the existing username for iPhones/iPads with the one acquired from Casper” |
| Overwrite the existing device type for iPhones/iPads with the one acquired from Casper | If set to “true” the device type (iOS) retrieved from Casper for iPhones/iPads will overwrite the device type which is already in NAC. If no operating system could be retrieved from CASPER for a given endsystem, then no change is performed in NAC. Be aware that this might mess up existing NAC processes if you are already retrieving and using the device type through some other mechanism like DHCP snooping –> this will be overwritten! But in most cases this feature should improve your current method (at least for end-systems managed by Casper) since the quality of the information retrieved from Casperis usually very good. |
| Overwrite the existing device type for MACs with the one acquired from Casper | If set to “true” the device type (OS) retrieved from Casper for MACs will overwrite the device type which is already in NAC. If no operating system could be retrieved from Casper for a given endsystem, then no change is performed in NAC. Be aware that this might mess up existing NAC processes if you are already retrieving and using the device type through some other mechanism like DHCP snooping –> this will be overwritten! But in most cases this feature should improve your current method (at least for end-systems managed by Casper) since the quality of the information retrieved from Casper is usually very good |
| Overwrite the existing device type for Advanced Search computers with the one acquired from Casper | If set to “true” the device type (operating system) retrieved from Casper for Advanced Search computers will overwrite the device type which is already in NAC. If no operating system could be retrieved from Casper for a given end-system, then no change is performed in NAC. Be aware that this might mess up existing NAC processes if you are already retrieving and using the device type through some other mechanism like DHCP snooping –> this will be overwritten! But in most cases this feature should improve your current method (at least for end-systems managed by Casper) since the quality of the information retrieved from Casper is usually very good. |
| Import data on iPhones and iPads from Casper | If set to “true” the module will retrieve data on all iPhones and iPads managed by Casper and push it into NAC. You must set this option to true if you want to import data on iPhones, want to push them to NAC end-system groups and perform assessment for them. |
| Import data on computers (MACs) from Casper | If set to “true” the module will retrieve data on all computers (MACs) managed by Casper and push it into NAC. You must set this option to true if you want to import data on computers, want to push them to NAC end-system groups and perform assessment for them. |
| Import data on Advanced Search computers from Casper | If set to “true” the module will retrieve data on all Casper Advanced Searches. It will try to map the MAC addressesfrom these searches into NAC end-system groups based on the configured ‘casperAdvancedSearch=…’ property within a NACend-system group’s description field. Advanced Searches are just for non-managed (i.e. Windows) devices and conditions that can’t be expressed using smart groups. Please ensure to set the display criteria of the search to include the data fieldsthat this OFC module is also expecting (see option ‘input_string_advanced_search_computer’) |
| Max number of days which the last inventory update for iPhones is allowed to be old | For example: If set to “5” the module will alarm (if assessment is enabled) if an iPhone’s last inventory update is older than 5 days. |
| Max number of days which the last inventory update for computers is allowed to be old | For example: If set to “5” the module will alarm (if assessment is enabled) if a computer’s last inventory update is older than 5 days. |
| Max number of days which the last check-in update for computers is allowed to be old | For example: If set to “5” the module will alarm (if assessment is enabled) if a computer’s last check-in update is older than 5 days. |
| Enable assessment for iPhones | If this is set to true, assessment data for iPads/iPhones will be made available to the assessment adapter. You must enable this feature if you want to quarantine iPads/iPhones based on their last inventory update timestamp. |
| Enable assessment for computers | If this is set to true, assessment data for computers will be made available to the assessment adapter. You must enable this feature if you want to quarantine iPads/iPhones based on their last inventory update timestamp. Assessment for computers from the “Advanced Computer Searches” is not supported! |
| Assessment Plugin Map | This list maps assessment data fields to certain plugin IDs. Do not touch this config! |
Control Config (NAC End-System Groups)
The Casper integration supports the automatic mapping of end-system MAC addresses from Casper groups into the corresponding Extreme Control end-system groups. The mapping of the group names from Casper to Control is performed based on matching group names. Since Casper supports assigning end-systems into multiple groups, the process of assigning end-system groups in Control is as follows. We will use an example with an end-system that is assigned to two groups:
- “iPhones 8th grade” and
- “iPhones 8th grade special”
The logic within Connect to assign that end-system to a group in Control is as follows:
- Connect will scan all Control end-system groups that have the string “sync=true” within their description field (all other groups are simply ignored by this process)
- If Connect finds neither the “iPhones 8th grade” nor the “iPhones 8th grade special” group, it will fallback by assigning that end-system to the configured default group for iPhones
- If Connect finds only one of those groups in Control it will assign the end-system to that group
- If Connect finds both those groups in Control it will look for a
second string / indicator which needs to existing with all Control
end-system groups’ description fields: “casperPriority=”. Using that
parameter, you can tell Connect which of all available Control groups
have which assignment priority. That parameter is configured as
number (integer) and the lower the value, the higher the priority for
that group (a value of 1 being the highest priority). If you have
configured the description fields of those two groups as follows:
- “iPhones 8th grade”: “sync= true, casperPriority=2”
- “iPhones 8th grade special”: “sync= true, casperPriority=1”
The end-system will be assinged to group “iPhones 8th grade special”.
Note
The minimum requirements to make end-system group assignment work with Casper Connect:
Use the exact same group names from Casper within Control
- Add these config parameters to each groups description field within Control:sync= true, casperPriority=1
Configure a unique casperPriority value for each of your Control groups!
Example screenshot:

Install Assessment Adapter (launchAS.sh)
If you want to use the assessment feature to quarantine Casper managed end-systems through Extreme Control you will need to start the Extreme Control assessment adapter. The adapter is implemented using this script:
/usr/local/Extreme_Networks/NetSight/jboss/server/default/deploy/fusion_jboss.war/assessment/launchAS.sh
First, change into this directory and make the script executable:
chmod +x launchAS.sh
Follow these steps to setup an effective auto-start and monitor solution for the launchAS.sh script:
- Monitoring (and auto-restarting if crashed) the launchAS.sh script
Create a new script that will act as the auto-start / monitor script: vim /usr/local/bin/connectMonitorLaunchAs.sh
Edit the script content below and then paste into the script file you just created (“i” takes you into insert/edit mode within vim). Ensure to provide the correct user credentials and your NetSight IP/name.
If you want to get notified in case the script crashes you can, alternatively, use this script.
The call to wget will automatically generate an event on the Extreme Management server (NetSight). Example:
Save the new file and exit (ESC and :wq)
Make the new script executable: chmod +x /usr/local/bin/connectMonitorLaunchAs.sh
To test the script, launch it manually using /usr/local/bin/connectMonitorLaunchAs.sh à your bash now prints a lot of data and is running the launchAS.sh. If you simply try to stop it (CTRL+C) it will automatically restart the launchAS.sh script. In order to actually stop the execution you will need to hit CTRL+C multiple times quickly.
You can now start the script and send into the background: /usr/local/bin/connectMonitorLaunchAs.sh &
- Auto-start on reboot
Edit crontab: crontab –e
Add a new line: @reboot /usr/local/bin/connectMonitorLaunchAs.sh
- You can test the solution by rebooting your Management server (reboot). After the reboot, login and check whether the launchAS.sh is running:

Setup Assessment in Extreme Control
You must create the assessment adapter as a valid assessment server before it can be used in NAC Manager.
- From the assessment configuration, select Assessment Servers and click Add to add a new assessment server.
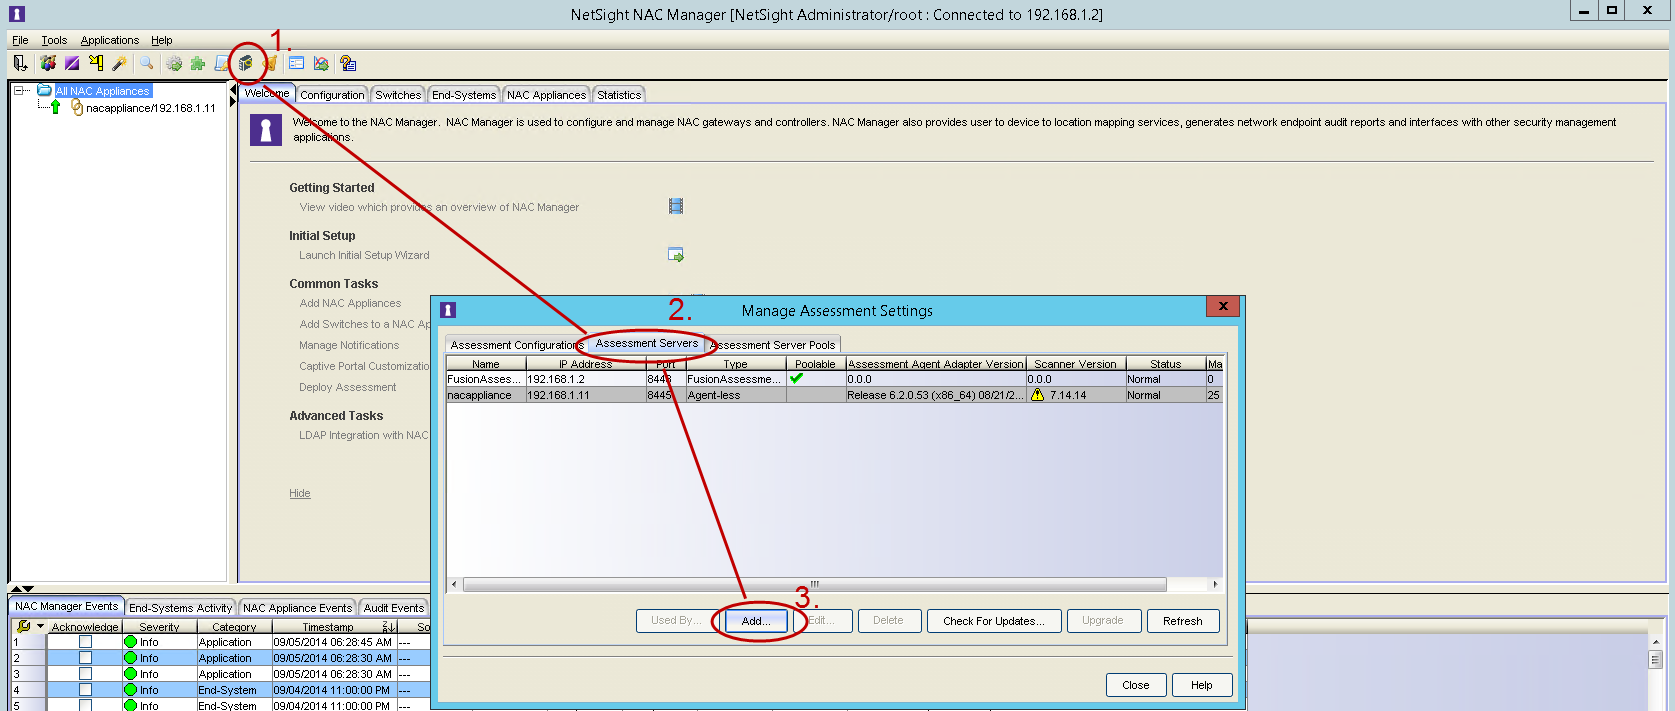
In the Edit Assessment Server dialog, provide the required data.
Assessment Server IP: IP address of the NetSight server.
Assessment Server Name: a name for easily identify our server.
- Assessment Server Port: by default, the adapter script (launchAS.sh)
runs on server 8448.
Assessment Server Type: FusionAssessmentAgent
- Max Concurrent Scans: leave empty. This can be used afterwards to
increase the capacity of the server. By default the server allows 10 concurrent scans.
To use this server for assessment purposes, it must be in an assessment pool used by an assessment configuration.
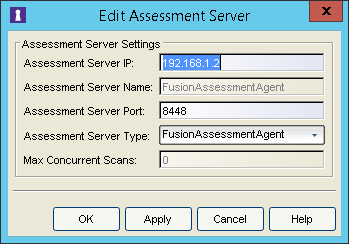
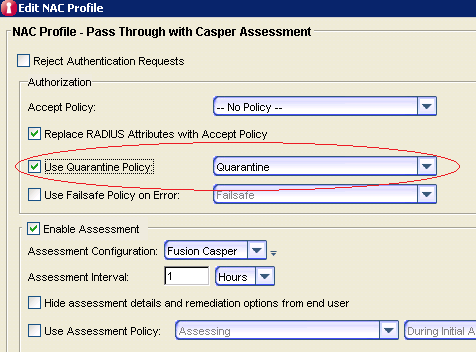
Ensure that you enable Use Quarantine Policy in the corresponding NAC profile and that the corresponding policy on the WLAN controller has a redirect configured within that policy that points to the NAC captive portal (external captive portal).
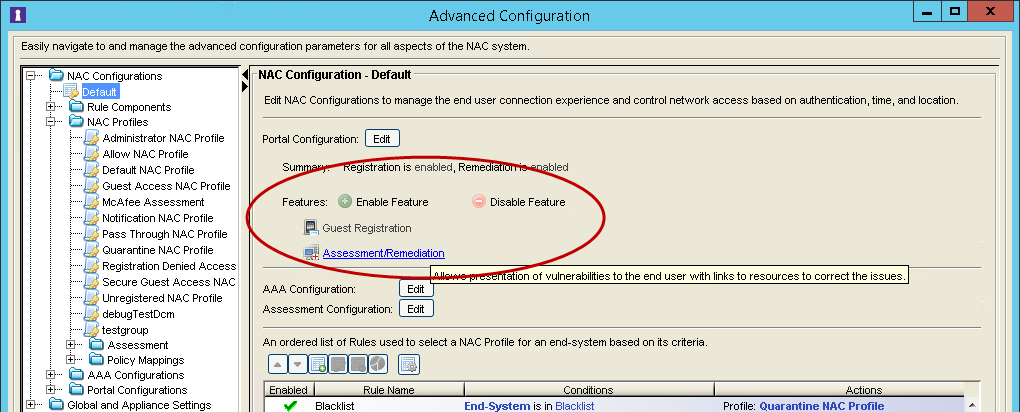
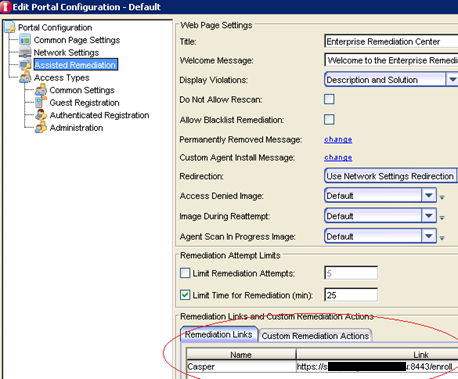
In the NAC configuration, enable Assisted Remediation for NAC to display the remediation/self-help page.
Customize your remediation portal.
For example, you can add a remediation link to the portal that allows users to understand why they have been quarantined and what to do about it.
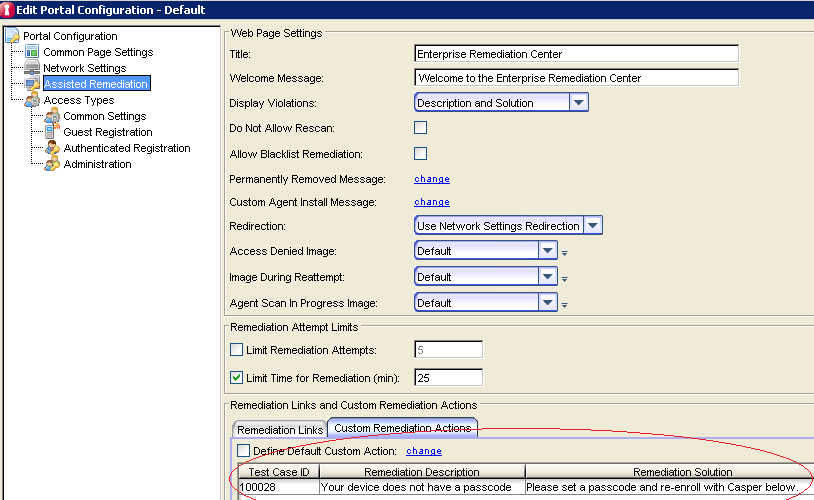
- Define the Custom Remediation Actions to improve the user experience
with the help texts on the remediation page.
- Configure Scoring OverrideAll assessment results retrieved via Connect will have a neutral test score of “0” by default. NAC will never quarantine end-systems with test results being zero. So if you want to use one or more of the test results to actually quarantine end-systems through NAC you will need to create a scoring override config for the corresponding test IDs.
Example: if you want to quarantine all iPads with an iOS version of 5.x you can configure a scoring override as follows:
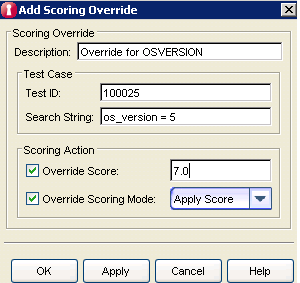
A value of “7.0” would (if the risk level configuration hasn’t been altered from the default one) ensure that this device will be marked with a “High Risk” level and will be quarantined. Make sure you have enabled “Use Quarantine Policy” in the corresponding NAC profile and that the corresponding policy on the WLAN controller has a redirect configured within that policy that points to the NAC captive portal (external captive portal):
Program Logic
This sections describes how the Casper integration operates.
Full vs Incremental Sync
The Casper integration provides two kinds of updates:
- Incremental sync: will only retrieve the latest list of end-system IDs from Casper and will compare it to the existing list of known IDs. If there are any new (unknown to Connect) IDs within Casper, Connect will retrieve the details on only those end-systems. All other end-system details (for known end-systems) are not retrieved and thus not updated during an incremental sync.
- Full sync: will retrieve the lastest list of end-system IDs from Casper, retrieve all details on all those end-systems and update Connect based on that latest data. The full sync will pick up on changes for existing (known) end-systems and also import and process new end-systems (unknown).
The incremental sync interval is configured using the “Poll interval in seconds” config paramater. The full sync interval can be configured using the “Full Re-Sync Interval” config parameter. It is recommended to set the the full sync interval as a multiple of the incremental sync interval. So if you want to run an incremental sync every 600 seconds you could, for example, run the full sync every 3600 seconds (six times the incremental sync interval). This should help lower the load on the Casper server since Connect won’t have to retrieve all data on all end-systems during every sync.
Setting both config parameters to the same value will lead to performing a full sync on each interval (=there won’t be any incremental synchronizations).
Casper API
Connect uses the following methods to retrieve the list of managed devices from Casper:
- Mobile devices: | https://<server>:<port>/JSSResource/mobiledevices
- Computers: | https://<server>:<port>/JSSResource/computers
- Advanced Search Computers: | https://<server>:<port>/JSSResource/ advancedcomputersearches
On an incremental sync those lists of device IDs are compared to the existing lists (from the last sync) and an import of detailed device data is only performed on new devices (=unkonwk IDs). On a full sync, detailed device data is retrieved for all devices based on those lists of IDs.
To retrieve a particular device, Casper provides an API method for three types of devices (mobile, computer advanced computer searches). All of them simply use the patterns described above and then add an “/id/<id>” extension. Example for an iPhone:
This retrieves an XML document with detailed data on each device including their group memberships.
Decommissioned End-Systems
On each full synchronization (not on any incrementeal sync), Connect will validate whether any end-systems have been deleted from Casper since the last full sync. To do so, it compares its internal list of end-systems with the currently retrieved list from Casper. If end-systems are on the internal list but not retrieved from Casper anymore, Connect assumes that they have been decommissioned within Casper. In this case, Connect will
- Delete the end-system from Connect (it will still be known to theExtremeConnect module as long as its MAC is within EMC but it’s data will not be updated by the Casper module anymore)
- Delete the end-system’s assessment data in case this end-system isre-assessed sometime in the future, there will be no assessment data for it anymore
- Move the MAC address of this end-system to a specific deletiongroup to make it obvious to the network administrator that this end-system is not managed by Casper anymore and to provision it with proper authorization rights. This feature needs to be enabled using the config option “End-system group for decommissioned devices”. The end-system group those end-systems will be moved to is configurable using the option “Remove device from other groups on decommission”.
Assessment
The assessment process assesses specific values which differ per device type retrieved from Casper.
Mobile Devices
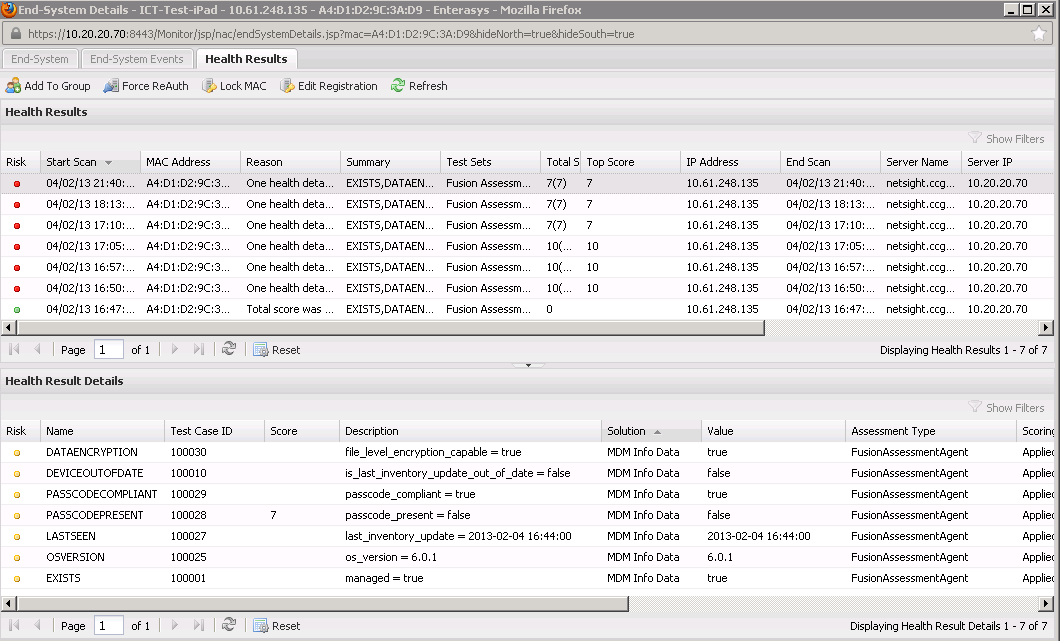
This diagram lists all plugin IDs that the Connect Casper integration produces for mobile devices:
| Plugin ID | Plugin Name | Casper Value |
|---|---|---|
| 100001 | EXISTS | managed |
| 100028 | PASSCODEPRESENT | passcode_present |
| 100029 | PASSCODECOMPLIANT | passcode_compliant |
| 100030 | DATAENCRYPTION | file_level_encryption_capable |
| 100027 | LASTSEEN | last_inventory_update |
| 100010 | DEVICEOUTOFDATE | computed by Connect based on config para “Max number of days which the last inventory update for iPhones is allowed to be old” |
| 100025 | OSVERSION | os_version |
The value for the plugin ID DEVICEOUTOFDATE is not a value directly retrieved from Casper but rather computed based on the Casper value of last_inventory_update. Whenever the Casper date in last_inventory_update is older than the number of days configured using the “Max number of days which the last inventory update for iPhones is allowed to be old” config parameter the value of this plugin ID will be set to “true” indicating that the corresponding iPhone/iPad’s Casper inventory is out of date.
Computers
This diagram lists all plugin IDs that the Connect Casper integration produces for computers:
| Plugin ID | Plugin Name | Casper Value |
|---|---|---|
| 100001 | EXISTS | remote_managed |
| 100027 | LASTSEEN | last_inventory_update |
| 100010 | DEVICEOUTOFDATE | - [computed by Connect based on config para “Max number of days which the last inventory update for computers is allowed to be old”] |
| 100025 | OSVERSION | os_version |
| 100031 | CUSTOM01 | last_checkin_update |
| 100032 | CUSTOM02 | - [computed by Connect based on config para “Max number of days which the last check-in update for computers is allowed to be old”] |
There is no assessment for “Advanced Search Computers” implemented!
Verification
This section provides information related to verifying that your integration is configured properly and performing as expected. In general, be aware that any data (including assessment data) will only be updated during the configured update intervals. For example, if you update only once per day, do not expect any updates within NAC more than exactly once per day. Also be aware of the fact that any data retrieved from Casper and any action triggered in direction to NetSight are handled by the ExtremeControl module, which has its own update interval and needs to pickup any changes/updates from the Casper module and push it to NetSight. Depending on the number of changes/actions during one cycle and the number of end-systems managed, you will need to provide some time before you validate the data in NetSight/OneView.
Data Import to NAC
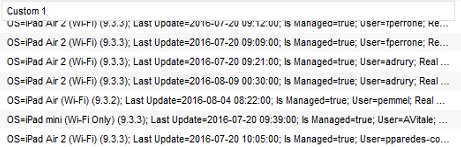
There are multiple areas to verify whether data on all devices managed by Casper is imported to NAC. One option is to use OneView’s end-system table under the “Control” tab and display the custom data field which you have configured for the Casper module. You might need to make the corresponding column visible first. If you enabled the corresponding features you should also see the username and a more detailed Device Type retrieved from Casper.
Custom field:
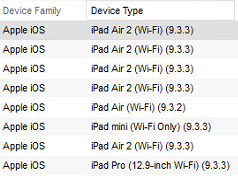
Device Types
Access Profiles
End-System Group Assignment
If you have setup your NAC end-system groups properly (see Control Config (NAC End-System Groups)) you should see the MAC addresses from Casper being automatically assigned to the corresponding end-system groups in Extreme Control. Example showing the default catch-all group for computers:

Remember that Connect will only assign each end-system to a single end-system group in Control. So if an end-system belongs to multiple groups in Casper it will only be assigned to the one that has the highest configured “casperPriority” value (within the Control end-system group description field).
Assessment
If you enabled assessment, the assessment data for mobile devices and computers (not for “Advanced Search Computers”!) is cached within Connect. Whenever Extreme Control performs an assessment on one of those end-systems, the latest assessment results retrieved earlier from Casper will be provided to the NAC assessment process. You can verify those test results within OneView:
Troubleshooting
This section describes steps you can take when you experience issues with the Casper integration.
Issue: I’ve installed and configured Connect and waited for a long time but I still don’t see any data coming into any custom field of any device, nor do I see assessment results during my scans.
Things to ensure:
- Make sure you restarted the NetSight server after you’ve successfully
- installed and configured Connect.
- Make sure you have enabled the feature to import data from Casper
- within the config file/management page.
- Make sure that the Casper useraccount and password configured for the
- Casper module are correct and have sufficient access rights to talk to the Casper API
- Test the connection to Casper’s API by using your browser and
- pointing it to one of the required URLs described in Casper API.
- Are you sure that the devices managed by Casper are more or less the
- same as those managed within NAC? Connect will only import and push data for those MAC addresses which are matching in Casper and NAC.